


US US
6 7
the pump body/bodies into the slot/s in the
upper basket. Arrange other breast pump
components as shown.
2. Place remaining components of the pump in
the lower basket.
3. Up to six 4 oz / 125 ml or 9 oz / 260 ml bottles
(not including screw rings, nipples or dome
caps) can be sterilized with the pump.
4. Follow sterilizing instructions.
To load the AVENT Tempo Natural
Feeding Nurser
Before each use, wash items to be sterilized in
mild, soapy water, and rinse.
1. Open the inner locking ring of the screw ring
and place the screw ring in the basket with the
locking tab facing downwards. Ensure that the
parts of the screw ring that are in contact with
the nipple are facing upwards.
2. Place the nipple and the dome cap in the
basket as you would when sterilizing a
bottle assembly.
3. Follow sterilizing instructions.
To remove sterilized items during or
after a cycle
(see diagram E)
1. Let the sterilizer cool down for 3 minutes
after sterilizing cycle has been completed.
2. Press the control button to reset (Mode 1)
or pause (Mode 2) the unit.
3. Wash your hands thoroughly before removing
the sterilized items.
4. Remove the lid.
5. If necessary, shake excess water from items
before assembling.
6. The tongs can be used to remove small items
and to pull the sterile nipples through the
screw rings of the bottles.
7. Removed items must be used/assembled
immediately or re-sterilized. Expressed milk
can be stored in a sterile breast milk container
in the refrigerator for up to 48 hours (not in
the door), in the freezer for up to 3 months, or
in a zero-degree freezer for up to 6 months.
Infant formula should be made up fresh for
each feed.
8. In Mode 1, the sterilizer must be left to cool
for at least 10 minutes between each use.
9. In Mode 2 – items can be removed/replaced
and then the cycle restarted. To restart, press
the control button. The unit will immediately
enter a new sterilization phase and continue
the 24 hour cycle from where it was
interrupted. If unplugged the countdown
cycle will stop.
Dishwasher Basket (see diagram F)
1. Two baskets can be clipped together to hold
small items such as nipples, breast pump parts
etc. for washing in the top rack of your
dishwasher prior to sterilization.
2. To clip together, align the baskets so that
the indicators are opposite each other and
snap the baskets together. To open, pull apart
with fingers.
Warning: Your Philps AVENT items may discolor
over time if they are washed in the dishwasher
with dirty items covered with remnants of strong
sauces, such as tomato sauce.
Care of your sterilizer
Using distilled water in your iQ24 Sterilizer can
reduce limescale build up. You should de-scale
your sterilizer every four weeks, or as often as
needed in hard water areas, to ensure it continues
to work 100% effectively.
Pour 100 ml vinegar mixed with 200 ml cold water
into the sterilizer. Allow to stand in the unit until
any limescale has dissolved. Drain and rinse the
inside of the sterilizer thoroughly. Wipe dry.
Limited Guarantee
Philips AVENT guarantees that the iQ24 Sterilizer
be free from manufacturers defects for 12 months
from the date of purchase. In the event of a defect,
Philips AVENT will repair or replace such parts free
of charge with proof of purchase. The i
Q24
Sterilizer must be used according to the
instructions. The claim must not be a result of a
accident, misuse, dirt, neglect or normal wear and
tear. For questions about this product or our
guarantee please call Customer Service at
1.800.54.AVENT.
Philips AVENT is here to help
For our complete catalog of mother and baby
care products and breastfeeding information
Call TOLL-FREE 1.800.54.AVENT
MANUFACTURED FOR: PHILIPS DOMESTIC
APPLIANCES AND PERSONAL CARE COMPANY,
A DIVISION OF PHILIPS ELECTRONICS NORTH
AMERICA CORPORATION. 1600 SUMMER STREET,
5 FL. STAMFORD, CT 06905-9991.
www.philips.com/AVENT
* Mode 1 only
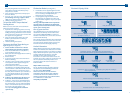
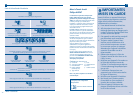
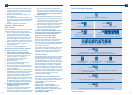
Electronic Display Guide
Sterilizer plugged in and ready for mode selection
Ready for Mode 1 selection
Mode 1 sterilization in progress – indicated
by a beep and rotating ‘0’
Mode 2 sterilization in progress – indicated by a
beep and three ascending and descending bars
Numerical countdown indicates sterilization almost complete*
BEEP
BEEP
Ready for Mode 2 selection
BEEP
BEEP
BEEP
X
5
Sterilization complete – indicated by 5 beeps and three flashing bars
– items will remain sterile for up to 6 hours provided the lid is not opened
Up to 6 hours sterile
time remaining
Up to 4 hours sterile
time remaining
Up to 2 hours sterile
time remaining
BEEP
– indicated by a long beep and a flashing ‘0’ Completion of
Mode 1 cycle (6 hours)
Mode 2 cycle (24 hours)
BEEP
Water level too high. See ‘Troubleshooting’ on back cover
Water level too low. See ‘Troubleshooting’ on back cover
BEEP