


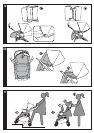


13 BACKREST: to recline the backrest lift the lever (fig_a) and choose one of the 4 positions
(fig_b).
14 FOOTREST: to lower the footrest push the two levers downwards and then push the footrest
downwards (fig_a); to raise the footrest lift it upwards (fig_b).
15 BABY SAFE SYSTEM: the stroller is fitted with a Baby Safe system which prevents the child
from slipping forwards when lying down. Pull the Baby Safe netting out of the pocket under
the rear ledge (fig_a), release the front bar, insert it into the netting (fig_b) and reattach the
front bar. Figure C shows the Baby Safe netting in place.
16 5-POINT SAFETY HARNESS: to attach the safety harness, insert the two buckles of the
waist strap (with shoulder straps attached) into the leg divider strap until it clicks into place
(fig_a). To release, press both sides of the buckle and pull the waist strap to the sides at the
same time (fig_b).
17 To secure the child with the safety harness, insert the shoulder strap buckle in the special
holder on the backrest (fig_a) and, after fastening the harness, detach the buckle from the
backrest to allow the child more freedom of movement (fig_b). Position the shoulder strap
buckle just below the child's shoulders to ensure the straps remain in place without slipping
(fig_c). To tighten the waist strap, pull on both sides in the direction of the arrow (fig_d). To
loosen it do the opposite. The waist strap can be tightened as far as the safety lock (fig_e).
18 HOOD: to open the hood, pull it forward. To close, push it backwards (fig_a). To convert the
hood into a sun canopy, open the double zipper (fig_c) and unfasten the snaps on the rear
of the backrest.
19 COVER: the cover can be used with the footrest in its raised position (fig_a): fit the cover,
button under the footrest and position above the front bar, securing with the elastic loops to
the hood buttons; alternatively, with the footrest lowered (fig_b): close the two side buttons
of the cover, fit the cover, button it under the footrest and insert it under the front bar,
securing it with the lateral magnets.
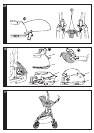
20 RAIN CANOPY: to attach, zip the rain canopy to the hood zip, fit under the footrest (fig_a)
and insert the two lateral loops over the hood buttons (fig_b). If you wish to temporarily
lower the rain canopy simply open the zip; the canopy will remain attached to the side
buttons (fig_c).
21 REAR LEDGE: the rear ledge makes it easier to negotiate curbs (fig_a) and can also be
used to transport a second child (fig_b). To use the stroller with two children, apply the
brakes, position the smaller child in the seat and attach the safety harness (1). Grip the
handles (2) and help the second child to climb onto the ledge (3).
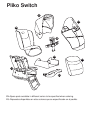
22 FOLDING: the stroller can be folded without the seat, with the seat facing the person
pushing the stroller, or with the seat facing forwards. If the seat is facing the person pushing
the stroller: before folding it, lower the backrest completely; if the seat is facing forwards:
before folding the stroller raise the backrest, and once it is folded, lower it. To fold the
stroller set the front wheels to their fixed position and close the hood. Lift the two levers of
the handles together and push directly toward the ground to release the side tubes (fig_a-b),
pull the central handle upwards (fig_c) until the safety catches engage (fig_d). When folded
the stroller will stand upright without support.
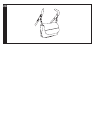
23 TRANSPORT: the stroller can be carried by the central handle, keeping the front wheels
fixed (fig_a) or by the side handle (fig_b).
24 REMOVING THE INTERNAL LINING: remove the leg divider strap (fig_a) from the top
(by pushing it up from under the seat), detach the two elastic loops of the sack from the
footrest and undo the four buttons on the seat (fig_b); Use a screwdriver to remove the hood
fastener, then remove the hood (fig_c),
25 undo the two snaps at the sides of the backrest and slip off the lining (fig_d), unscrewing the
safety belts from both sides (fig_e).
26 REMOVING THE OUTER LINING: first remove the internal lining, then with the backrest
in its raised position detach the two elastic loops on the inside (fig_a), detach the two