


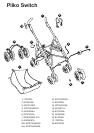

_ Pliko Switch is made up of two elements: Pliko Switch CHASSIS and Pliko Switch SEAT.
COMPONENTS OF THE ITEM
Check the contents of the packaging and if you have any questions please contact the
Assistance Service see warranty for details.
_ Pliko Switch Chassis: basket; 2 swivelling or locking front wheels; 2 rear wheels with brake
cable and cup holder.
_ Pliko Switch Seat: front bar; hood; cover; rain canopy.
INSTRUCTIONS
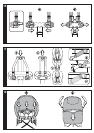
1 PACKING PROTECTION: before opening the chassis remove the protection (fig_a),
otherwise it will not open correctly (fig_b).
2 OPENING: raise the two levers together (fig_a) and pull upwards until the chassis is
completely open (fig_b). Check that the chassis is correctly opened: the side tubes must be
locked together (fig_c).
3 INSTALLING THE FRONT WHEELS: press the lever of the two front wheels (fig_a), insert
the wheel until it clicks into place (fig_b) and check that it is securely attached (fig_c).
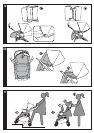
4 INSTALLING THE REAR WHEELS: carefully distinguish between the two rear wheels
connected by the brake cable: the rear left wheel features a slot that matches a
corresponding rib on the rear left chassis tube. Press in the wheels until they click into place
(fig_a) and check that they are firmly attached (fig_b).
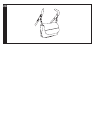
5 ATTACHING THE BASKET: insert the loops over the front hooks (fig_a) and rear hooks
(fig_b) and button down the two flaps around the front tube (fig_c).
6 ATTACHING THE CUP HOLDER: insert the cup holder on the corresponding peg and press
down until it clicks into place (fig_a). The cup holder can be attached to either side of the
chassis.
7 EXTENDABLE HANDLES: to extend the handles press the top of the button and pull
upwards the same time (fig_a); to retract the handles press the bottom of the button and
push the handle downwards at the same time (fig_b).
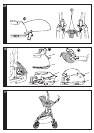
8 FIXED OR SWIVELLING FRONT WHEELS: lift the levers to prevent the front wheels from
swivelling (fig_a), lower the levers to allow the front wheels to swivel (fig_b). On uneven
surfaces the wheels should be set to their fixed position.
9 REAR WHEELS WITH CENTRAL BRAKE CABLE: press a brake lever to set the brake
(fig_a), lift the lever to release it (fig_b).
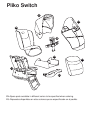
10 MOUNTING THE SEAT TO THE CHASSIS: the reversible seat can be attached to the
chassis either facing the person pushing the stroller (fig_a), or facing forwards (fig_b), place
the seat on the chassis so that it is aligned with the relative symbols and press downwards
with both hands until you hear two clicks confirming that it has locked into position. Ensure
the seat is correctly secured by attempting to pull it upwards by gripping the front bar.
11 REMOVING THE SEAT FROM THE CHASSIS: move the two levers in the direction of
the arrow (fig_a) and squeeze the two handles up (fig_b) to release. Pull the two handles
upwards until the seat is released. The seat can be removed from and re-attached to the
chassis when it is occupied by a child.
12 FRONT BAR: to attach the front bar, slide the connections into the end of the armrests,
press the two side buttons and push the bar towards the seat until it clicks into place (fig_a).
To remove the front bar press the two buttons and pull it outwards (fig_b). Open the front
bar at one side only so that the child can be positioned in or removed from the seat more
easily.