


SAFETY BELT
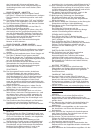
56• Make sure that the strap has been correctly
inserted as shown in Figure A. Fasten the safety
belt as shown in Figure B.
57• To unfasten the safety belt, press the sides of the
buckle (Figure A) and pull the waist belt outwards
(Figure B).
58• The new safety belt is easier to wear, thanks to
the “snap open and shut” system. Before attaching
the safety belt, attach the small buckle to the
backrest by inserting the tab into the special
holder, as shown in the figure. Next, fasten the
safety belt on your child, and then detach the belt
from the backrest to allow the child more freedom
of movement. The small buckle should be placed
below the child!s shoulders.
ADJUSTING THE BACKREST
59• The backrest reclines in four different positions.
To recline the backrest, lift the handle (Figure A)
while lowering the backrest (Figure B), stopping at
the desired position. To raise the backrest, pull it
upwards.
REMOVABLE LINING
60• To remove the lining from the stroller, unhook the
sack fasteners from the armrests, as shown by the
arrows.
61• Unbutton the sack from the seat, and slip it off the
hooks on the footboard.
62• Unbutton the side buttons on the sack, as shown
in the figure. Slip the safety belt leg divider out
from under the seat.
63• Unbutton the buttons on the sack from the seat,
and slip the sack off the hooks on the footboard.
Slip the sack off the bottom of the stroller.
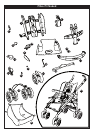
PLIKO P3 NAKED STROLLER with the
GANCIOMATIC SYSTEM
The Ganciomatic system is a practical, fast way
to fasten the Navetta bassinet unit and the Primo
Viaggio car seat – which are both equipped with the
Ganciomatic system - to the Pliko P3 Naked stroller,
using the Ganciomatic hooks.
GANCIOMATIC HOOKS ON THE STROLLER
64• To raise the Ganciomatic hooks on the stroller, lift
the sack in the corners of the seat and turn the
two hooks upwards until they click into place.
65• To lower the Ganciomatic hooks on the stroller,
pull the lever outwards while turning the hooks
downwards, as shown in the figure.
PLIKO P3 NAKED + NAVETTA
66• To fasten the Navetta bassinet unit to the stroller,
it is necessary to first:
- Set the brakes on the stroller;
- Completely lower the backrest on the stroller;
- Raise the Ganciomatic hooks on the stroller;
- Remove the front bar and insert the caps to close
the stroller armrests;
- Lift the stroller footboard to its highest position;
- Hold the Navetta bassinet unit by its handle;
- Place the bassinet unit on the Ganciomatic hooks
on the stroller, keeping the head of the bassinet
unit on the opposite side from the stroller
handlebars;
- Press down with both hands on the sides of the
Navetta bassinet unit, until it clicks into place;
- To remove the Navetta bassinet unit from the
stroller, consult the instruction manual.
PLIKO P3 NAKED + PRIMO VIAGGIO
67• To fasten the Primo Viaggio car seat to the
stroller, it is necessary to first:
- Set the brakes on the stroller;
steps shown in Figures 2 and 3.
• To fold up the Pliko P3 Naked stroller, loosen
the hood braces, lift the backrest, and repeat the
steps shown in Figures 13, 14, and 15.
ADJUSTING THE FOOTBOARD
40• The footboard can be adjusted to three positions.
To lower the footboard, pull the two side levers
downwards. To lift the footboard, pull it upwards
until it clicks into place.
REAR FOOTBOARD
41• The rear footboard helps the mother to push the
stroller over small bumps, and can be used to
carry a second child.
LOADING
42• To use the Pliko P3 Naked with two children, first
set the brakes on the stroller. Next place the
smaller child in the seat and fasten the safety belt
(1). Hold the handlebars (2) and have the second
child stand on the rear footboard (3).
• Never leave your children alone in the stroller.
• Do not allow a child to stand on the rear footboard
when the stroller is empty.
HOOD
• The hood has a zipper for attaching the rain
canopy.
43• To attach the hood, push the fasteners downwards
until they click into place, as shown in the figure.
44• Button the hood to the inside of the armrests and
to the backrest on the stroller, as shown in the
figure.
45• To open the hood, push the braces downwards.
The hood can be lowered along with the reclining
backrest.
46• It is possible to detach the back part of the fabric
by unzipping it and use the hood as a sun canopy.
47• To reattach the back part of the fabric, proceed as
indicated in the figure.
48• By lowering the stroller backrest, the hood
extends and, thanks to the double zipper, a
window can be created to allow more air to
circulate and see the child when sleeping.
49•
To remove the hood, unbutton it from the stroller
and loosen the braces. Lift the tabs on the fasteners
by pressing towards the inside of the stroller.
COVER
50• To fasten the cover to the stroller, zip it onto the
footboard as shown in the figure.
RAIN CANOPY
51• To attach the rain canopy, zip it to the hood.
52• Fasten the button found on the elastic to the
stroller button until you hear a click, as indicated
in the figure.
53• Fasten the elastic on the bottom of the rain
canopy to the wheel.
54• The practical rain canopy can be lowered by
opening the zipper; it will remain fastened to the
stroller by the elastic.
55• This rain canopy has been designed for use with
the Primo Viaggio car seat fastened on the stroller
as well, to guarantee your child total protection.
• Do not use the rain canopy in closed places.
Always check from time to time to make sure the
child is not too hot.
• Do not place the PVC rain canopy near sources of
heat. Keep cigarettes away from the rain canopy.
• Make sure the rain canopy does not get caught in
any moving mechanism on the chassis or stroller.
• Always remove the rain canopy before folding up
the chassis or stroller.
• Clean the rain canopy with a sponge and soapy
water. Do not use harsh detergents.