


attaching the Navetta bassinet unit;
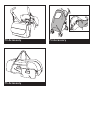
25• Hold the Navetta bassinet unit by its handle, and
place it on the Ganciomatic hooks on the chassis,
keeping the head of the bassinet unit on the
opposite side from the chassis handlebars.
- Press down with both hands on the sides of the
Navetta bassinet unit, until it clicks into place.
- To remove the Navetta bassinet unit from the
chassis, consult the instruction manual.
PLIKO P3 NAKED + PRIMO VIAGGIO
To fasten the Primo Viaggio car seat to the Pliko P3
Naked chassis, first:
- Set the brakes on the Pliko P3;
- Attach the front bar (see the “Front Bar” section
below).
26• The Pliko P3 Naked chassis is now ready for
attaching the Primo Viaggio car seat.
27• Hold the car seat by its handle, and place it on the
Ganciomatic hooks on the chassis, keeping the
head of the car seat on the opposite side from the
chassis handlebars. Press down with both hands
on the sides of the car seat, until it clicks into
place.
- To remove the car seat from the chassis, consult
the instruction manual.
FRONT BAR
28• The chassis comes with caps closing the ends
of the armrests. To fasten the front bar to the
chassis, remove the caps (keep them for when
you want to use the chassis without the front bar).
To remove the caps, press the buttons under the
armrests while pulling the caps off.
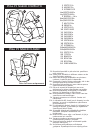
29• To fasten the front bar to the chassis, slip the two
ends of the front bar into the armrests as shown
in the figure, pressing until the bar clicks into
place.
30• The front bar can be opened on one side only to
allow the child to get in and out of the stroller
easier when he or she is older. To open the front
bar, press the button under the armrest while
pulling the front bar outwards.
31• To remove the front bar, press the two buttons
under the armrests while pulling the bar off the
chassis.
HOW TO TURN THE CHASSIS INTO A STROLLER
ASSEMBLY
32• To turn the Pliko P3 Naked chassis into a stroller,
make sure the two levers are lowered as shown in
the figure.
33• Place the backrest with the sack on the seat of the
chassis, as shown in the figure.
34• To fasten the backrest to the chassis, insert the
two ends of the backrest into the seat of the
chassis while pressing the two buttons, as shown
in Figure 1. Press on the backrest until it clicks
into place, as shown in Figure 2.
35• To attach the backrest adjustor to the chassis,
turn the fastener upward (Figure B – turn in the
direction shown by the arrow), placing it behind
the rear brace.
36• Push the two fasteners downward until they click
into place on the braces.
37• To line the stroller, fasten the sack to the armrests
as shown by the arrows in the figure.
38• Insert the footboard levers into the sack on the
backrest, as shown in the figure.
39• Finally, fasten the buttons on the sack at the
bottom, as shown in Figure A. Pass the lower leg
divider belt under the seat, as shown in Figure B,
and leave the upper leg divider over the sack.
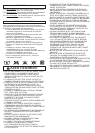
OPENING AND FOLDING UP
• To open the Pliko P3 Naked stroller, repeat the
hooks in the front (A) and the rear (B and C).
9• The figure shows the basket fastened to the
stroller.
10• The drink holder can be mounted on the right or
left handlebar with the two special bands.
11• To fasten the drink holder to the handlebar, open
the band and press the drink holder into it as
shown in the figure, letting it click into place.
•
Warning: do not place hot drinks or drinks weighing
more than 1 kg. (2.2 lbs) in the drink holder.
BRAKES
12• To set the brakes on Pliko P3 Naked, lower the
lever on the rear wheels with your foot, as shown
in the figure.
• To release the brakes, lift the lever.
• Always set the brakes when the stroller is not
moving.
SWIVEL WHEELS
13• To swivel the front wheels, lower the lever as
shown in figure A. To set the wheels on stationary,
lift the lever as shown in figure B.
ADJUSTING THE HANDLEBARS
14• The height of the handlebars can be adjusted to
two positions. For the higher position, press the
button while pulling the handlebar upward. To
lower the handlebar, press the button and push
the handlebar downward.
FOLDING UP PLIKO P3 NAKED
• Before folding up Pliko P3 Naked, remove the
Navetta bassinet unit or Primo Viaggio car seat.
15• The stroller can be folded up using one hand only.
Pull first one lever upwards and then the other,
until they click.
16• Grab the central handlebar (Figure 3) and pull
upward until the stroller folds up, as shown in the
figure.
17• Check to make sure that the safety hook is
fastened. The folded stroller will stand upright.
CARRYING
18• Pliko P3 Naked can be conveniently carried (with
the front wheels set on stationary) when held by
the central handle, as shown in the figure.
19• The side handle can also be used to carry the
stroller, as shown in the figure.
THE GANCIOMATIC SYSTEM with
THE PLIKO P3 NAKED CHASSIS
The Ganciomatic system is a practical, fast way
to fasten the Navetta bassinet unit and the Primo
Viaggio car seat – which are both equipped with the
Ganciomatic system - to the Pliko P3 Naked chassis,
using the Ganciomatic hooks.
GANCIOMATIC HOOKS ON THE CHASSIS
20• To raise the Ganciomatic hooks on the chassis,
turn them upwards until they click into place, as
shown in the figure.
21• To lower the Ganciomatic hooks on the chassis,
pull the lever outwards while turning the hooks
downwards, as shown in the figure.
PLIKO P3 NAKED + NAVETTA
To fasten the Navetta bassinet unit to the Pliko P3
Naked chassis, first:
- Set the brakes on the Pliko P3;
- Raise the Ganciomatic hooks;
22• Turn the two levers on the rear of the chassis
outwards, as shown in the figure;
23• Lift the chassis footboard to its highest position
(Figure 1);
24• The Pliko P3 Naked chassis is now ready for