


HEIGHT ADJUSTABLE Skate-SEAT
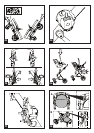
18• The Skate-seat is height adjustable to 3 positions:
To adjust the height, press the two side buttons
on the Skate chassis and simultaneously move
the Skate-seat up or down until they click into
place. To make sure that the Skate-seat is secured,
check the 3 arrows on the Skate chassis.
LEGREST
19• If the Skate seat is in the carriage position, the
leg rest must stay in the reclined (flat) position. If
the Skate seat is in the stroller seat position, the
leg rest can be adjusted to 2 positions (reclined
or upright).
20• To adjust it, pull the side adjuster traps and place
over the side pins. Pull the additional loose strap
under the stroller seat and attach it to the Velcro
on the bottom of the seat.
BACKREST
21• The backrest can be set in 3 positions:
horizontal, partially raised, and raised.
To adjust the backrest, take the central strap and
place one of the 3 eyelets on the pin behind the
backrest.
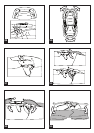
BUMPER BAR/CARRYING HANDLE
22• To attach it, place the fasteners of the bumper
bar on the Skate-seat side buttons, push the
buttons down and slide the bumper bar into the
groves until it snaps in. The bumper bar can be
attached to the Skate-seat in one way only.
23• To remove it, press the button below the
bumper bar and slide out of the groves.
24• The bumper bar can be opened and closed: to
make it easier for the child to go in and out of
the stroller when he/she is older.
To open it: press the two round buttons
simultaneously and pull the bumper bar outwards.
To close it: follow these steps the other way round.
25• The bumper bar can be adjusted to 2 positions:
position (A) – bumper bar mode – and position
(B) – carrying handle mode, to carry a child up
to 9 kg (19.8 Ibs) only when the Skate-seat is
used as a carriage.
• To adjust it in height: open the two levers inward,
move the bumper bar up or down and close the
two levers again.
DETACHING THE Skate-SEAT FROM THE Skate
CHASSIS
26• Raise the bumper bar to the up position (carrying
handlebar), hold it and pull it upwards (1), detach
the Skate-seat on one side (2) then on the other
(3) by pressing the tabs where the hood attaches.
• IMPORTANT: when the child is seated, this
operation can be carried out only if the
Skate seat is in carriage mode and your
child weighs less than 9 kg (19.8 Ibs).
REVERSIBLE Skate-SEAT
• The Skate-seat is reversible, so it can be attached
to the Skate chassis to face parents or let your
child see what’s ahead.
27• Skate carriage seat: must be fixed to the Skate
chassis so it faces parents to keep a constant eye
on your little baby.
28• Skate stroller seat: can be fixed to the Skate
chassis so the baby can face parents (1) or see
what's ahead (2).
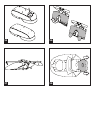
HOOD
29• To mount the hood, insert the hood fasteners
into the proper holes of the Skate seat with the
snaps to the rear of the stroller seat, then fasten
all 4 snaps on the Skate seat.
30• To remove it, unsnap the hood from the side
Skate seat, press in the thin black buttons under
the grey tabs and pull the hood off.
31• The hood can also be extended for use in the
carriage mode by unzipping the zipper on the
outside of the hood.
BOOT
32• To place the boot on the Skate seat, fasten the
two snaps at the bottom of the Skate seat and put
the elastic strings onto the two side pins on the
bumper bar. The boot also has side magnets to
help secure it to the Skate seat. When using the
boot in the carriage position you can unzip the
boot to allow more room for your children’s feet.
RAIN COVER
33• To attach it, zip the rain cover and the hood
together (A), pull the bottom part of the rain
cover under the Skate-seat (B), pass the elastic
strings and buttons behind the
locking system
of the Skate-seat (C), then button them up to
the rain cover (D).
• The rain cover can be opened while attached to
the Skate-seat due to the elastic strings, but the
zipper must be open.
• If you want to turn the Skate-seat, you do not
need to remove the rain cover as it is attached
to the Skate-seat and not to the Skate chassis.
• Do not use the rain cover in closed
environments and always make sure the child is
not too hot.
• Do not place the rain cover near heat sources
and be careful with cigarettes.
• Check that the rain cover does not hinder the
correct functioning of the carriage or stroller.
• Always remove the rain cover before closing
your carriage or stroller.
• Wash with a sponge and soap water, without
using detergents.
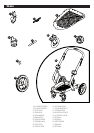
5 POINT HARNESS SAFETY BELT
34• Safety belts are stored under the interior Skate-
seat padding in their proper housings.
35• The seat belt is hidden under the interior Skate-seat
padding: From the carriage position to access the
safety belts, you need to unsnap the 4 snaps where
the backrest meets the bottom of the seat. Pull up
the seat pad and pull the shoulder harness out. Next
slide the crotch strap thru the slit in the seat pad.