


• Wash the rain canopy with a sponge and soapy
water. Use only mild soap, not strong detergents.
BRAKE
27• To set the brake on the stroller, lower the brake
pedal on the rear wheel unit. To release the brake,
pull the pedal upwards.
Always set the brake when the stroller is not
moving.
SAFETY BELT
28• A: Make sure that the brace is properly inserted by
pushing as shown in the figure. B: Fasten the belt
as shown in the figure.
29• To unfasten the belt, press on the buckle sides
and pull out the waist strap.
30• The new safety belt is now easier to fasten thanks
to the "snap-open-and-shut" device. Before
fastening the safety belt, attach the buckle to the
backrest by inserting the tab through the special
holder, as shown in the figure. After fastening
the safety belt on your child, detach it from the
backrest to allow the child more freedom of
movement. The buckle must remain below the
child's shoulders.
ADJUSTING THE BACKREST
31• The stroller backrest reclines to four different
positions. To lower the backrest, pull the handle
upwards while lowering the backrest, stopping at
the desired position. To raise the backrest, pull it
upwards.
ADJUSTING THE FOOTBOARD
32• The footboard can be adjusted to four different
positions. To lower it, pull the two side levers
towards yourself while lowering the footboard. To
lift the footboard, simply pull it upwards until it
clicks into place.
FRONT SWIVEL WHEELS
33• To swivel the front wheels, lower the lever as
shown in the figure. To set them on stationary,
release the lever.
LEVERAGE PEDAL
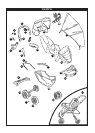
34• The rear leverage pedal makes it easier to push
the stroller up small steps or over bumps.
FRONT BAR WITH TRAY
35• The practical front bar opens and closes to make
it easier for the child to get in and out of the
stroller when he or she is older. To open the bar,
press the button under it while pulling the bar
upward.
• To remove the front bar, press both buttons on it
while pulling it out.
• If you want to use the stroller without the front
bar, use the side buttons on the armrests to
retract the hooks.
36• To attach the tray, place it on the front bar and
press downward.
37• To remove the tray, lift the center front lever on
the tray with one hand while pulling the lever on
the inside of the tray with the other hand, first on
one side and then on the other.
ADJUSTING THE HANDLEBAR
38• To regulate the length of the handlebar, press
the side buttons and pull the handlebar towards
yourself to lengthen it.
BASKET
39• The stroller basket adjusts to three positions.
A: Normal.
B: Lowered for use even when the backrest is
completely lowered. By pressing on the basket,
things can easily be put into it without disturbing
the baby.
C: Raised basket to allow access to the rear
leverage pedal.
REMOVING THE WHEELS
40• To remove the front wheels, swivel them by
pressing the levers, while pushing the wheel
downwards until it comes completely off, as
shown in the figure.
41• To remove the rear wheel unit, loosen the screws
on the inner part of the rod. Slip the wheel unit off
the stroller, as shown in the figure.
FOLDING UP THE STROLLER
If the hood is attached, loosen the braces before
folding the stroller up.
42• To fold the stroller up, lower lever 1 then lever 2,
as shown in the figure.
43• Pull the handlebar upward and then push it
downward until it clicks into place.
44• Make sure the safety hooks are fastened, as
shown in the figure. When folded, the stroller will
stand upright.
OPENING THE STROLLER
45• To open the stroller, release both safety hooks at
the same time, as shown in the figure.
46• Pull the handlebar upwards firmly, and then push
it downwards to the last click.
REMOVABLE LINING
47• To remove the lining from the stroller, lift the
footboard and slip the sack off, as shown in the
figure. Slip the leg divider out from under the
seat.
48• Unfasten the sack at the sides, as shown in the
figure. Repeat on both sides.
49• Slip the two tabs on the sack off the backrest.
50• Finally, pull the sack upwards, slipping it off the
safety belt.
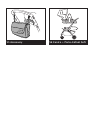
GANCIOMATIC SYSTEM
The Ganciomatic System is the swift, practical system
that allows one to fasten the following products,
which can be bought separately and are also equipped
with Ganciomatic System, to the stroller, thanks to
Ganciomatic fasteners.
• Primo Viaggio: a car seat with base, it can be
detached from its base (which stays in the car)
and attached to the Ganciomatic fasteners of the
stroller to transport your child without disturbing
him/her.
• Navetta: the comfortable bassinet unit becomes
a carriage when attached to the fasteners of
the stroller. Equipped with a foldable hood and
carrying handle, both the air circulation regulation
system inside the bassinet and the inclination
of the backrest are adjustable from outside. At
home, it rocks like a cradle and, when the stand is
taken away, it becomes a little bed.
GANCIOMATIC HOOKS ON THE STROLLER
51• To raise the Ganciomatic hooks on the stroller, lift
the sack at the corners of the seat.
52• Raise the two Ganciomatic hooks. They will
automatically move outwards.
• To lower the hooks, pull them inward and down.
CENTRO + PRIMO VIAGGIO
53• To fasten the car seat to the stroller:
- set the brake on the stroller;
- remove the hood from the stroller;
- lower the stroller backrest to the next-to-lowest
position;
- raise the Ganciomatic hooks on the stroller;