


• IMPORTANT: read these instructions carefully and
keep them for future reference.
Failure to follow these instructions could put the
childʼs safety at risk.
• PEG PEREGO reserves the right to make any
necessary changes or improvements to the products
shown at any time without notice.
Peg Perego S.p.A. is an ISO 9001 certified
company.
The fact that we are certified provides
a guarantee of our honesty for our
customers, and fosters trust in the
companys way of working.
CUSTOMER SERVICE
If parts of the model are accidentally lost or damaged,
use only original Peg Perego spare parts. Contact
the Peg Perego Customer Service for all repair work,
replacements, information about products, and sale of
original spare parts and accessories, at the following:
tel.: 0039-039-60.88.213
fax: 0039-039-33.09.992
e-mail: assistenza@pegperego.it,
www.pegperego.com
Peg Perego is at the consumer's service, meeting
every need in the best way possible. This is why our
customers' opinions are so important and valuable
to us. We would be very grateful if you would kindly
fill in the CUSTOMER SATISFACTION QUESTIONNAIRE
after using one of our products. You will find the
questionnaire on the Internet at "www.pegperego.
com/SSCo.html.en-UK".
Please note any observations or suggestions you may
have on the questionnaire.
INSTRUCTIONS FOR USE
ASSEMBLING THE STROLLER
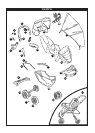
1• Remove the product from the box and make sure
you have all the following pieces: handlebar, front
bar with tray, rain canopy, hood, cover, basket,
and front and rear wheel units.
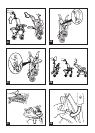
2• To open the stroller frame, lift the safety levers on
the side bars as shown in the figure.
3• Pull the side bars on the frame firmly upwards.
4• Push the sides of the stroller downward until they
click into place, to completely open the stroller
frame.
5• To mount the front wheels, lower lever A and
fasten the wheels as shown in the figure, clicking
them into place.
6• Before mounting the rear wheel unit, slip the rear
leverage pedal into the tracks, as shown in the
figure.
7• Insert the rear wheel unit into the tracks as shown
in the figure. To fasten the wheel unit to the
tracks, insert the screw from the outside and
fasten the nut from the inside. Use a screwdriver
to fasten the screw, while holding the nut tight on
the other side. Lower the rear leverage pedal and
fasten it to the stroller.
8• To mount the handlebar, line it up with the two
sides of the stroller, as shown in the figure.
9• To fasten the handlebar, press the side buttons as
shown in the figure while slipping the handlebar
into place and pushing it downwards. To fasten
the handlebar properly, make sure that the
buttons have passed by both holes on the inside
of the handlebar (shown by the arrow). When the
EN•ENGLISH
handlebar is properly positioned, hole A should be
lined up with point B.
10• Fasten the handlebar to the sides of the stroller,
placing the cap on the outside and the screw on
the inside. Use a screwdriver to tighten the screw
on both sides, without forcing it.
11• Before mounting the front bar, press the side
buttons on the armrests to extract the hooks, as
shown in the figure.
12• To fasten the front bar, keep the buttons
underneath it pressed while slipping it onto the
stroller.
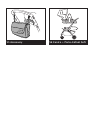
13• Remove the basket from the packing as shown in
the figure, and assemble it.
14• Slip the two ends of the basket rod into their
housings. Make sure that the two buttons are
positioned correctly, and fasten the two front
basket loops to them, as shown in the figure.
15• Fasten the basket loops on both sides, as shown
in the figure.
16• Before mounting the drink-holder, decide which
side of the handlebar you want it on. Use both
hands to open one of the supplied bands as wide
as possible, proceeding as shown in the figure.
Fasten the drink-holder to the inside of the band,
as shown in the figure.
17• Insert the two caps as shown in the figure, making
sure to line them up correctly. Use two coins
to turn the caps and fasten the drink-holder, as
shown in the figure.
Do not place hot drinks or drinks weighing more
than 0.5 kg. or 1 lb. in the drink-holder.
HOOD
18• To fasten the hood to the stroller, insert the hooks
into their housings.
19• Button the hood to the back of the backrest and to
the inside of the armrests, as shown in the figure.
20• Lower the braces on both sides, to pull the hood
taut.
21• Using the reversible feature, the hood can
also be mounted on the opposite side of the
handlebar. Before removing the hood to place
it on the opposite side, close it and push it all
the way forward to rotate the hooks. Remove
the hood and remount it on the opposite side
of the handlebar. You can also rotate the hooks
manually.
COVER
22• To fasten the cover to the stroller, button it under
the footboard as shown in the figure and fasten it
on the sides by inserting the tabs into the special
hooks under the armrests.
RAIN CANOPY
23• To mount the rain canopy, zip it onto the hood.
24• Slip the elastic fastener around the side of the
stroller as shown in the figure and button it to the
rain canopy. Fasten the bottom elastic fastener
near the wheel.
25• The practical rain canopy can be lowered by
opening the zipper. The elastic will keep the
canopy fastened to the stroller.
26• This rain canopy has also been designed for use
with the Primo Viaggio car seat fastened on the
stroller, to shelter the child completely.
• Do not use the rain canopy in closed areas. Always
check from time to time to make sure the child is
not too hot.
• Do not place the PVC rain canopy near heating
sources. Keep cigarettes away from the rain
canopy.
• Make sure the rain canopy does not become
entangled with any moving mechanism on the
stroller or the chassis.
• Always remove the rain canopy before folding up
the chassis or stroller.