


- 12 -
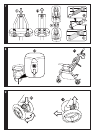
straps attached) into the leg divider strap
until you hear a click (fig_a). To release, press
the sides of the buckle and simultaneously
pull the waist strap outwards (fig_b).
7 To put on the safety harness, insert the strap
adjuster into the slot in the backrest (fig_a)
and remove it after fastening the harness
to allow the child to move freely (fig_b).
Place the strap adjuster just beneath child’s
shoulder level so the shoulder straps do not
slide off (fig_c). To tighten the waist strap, pull
in the direction of the arrow on both sides
(fig_d). To loosen it do the opposite. The waist
strap may be tightened up to the safety stop
(fig_e).
8 BACKREST ADJUSTMENT: to recline the
backrest, lower the backrest adjuster (fig_a)
and simultaneously push the backrest down
(fig_b). To lift the backrest, push the backrest
adjuster up.
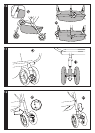
9 SWIVEL WHEELS: to make the front wheels
swivel, lower the lever (fig_a). To fix them in
place, lift the lever (fig_b).
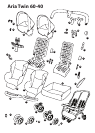
10 BASKET REPLACEMENT: Should the basket
need to be replaced, fasten it to the clips
at the front (fig_a) and button it to the rear
(fig_b).
11 WHEEL REMOVAL: the stroller wheels may
be removed. To remove the front wheels,
turn them to swivel position, push the levers
(fig_a) and simultaneously push the wheel
downwards until it is released (fig_b).
12 To remove the rear wheels, press the button
(fig_a) and at the same time push the wheels
down until they come off (fig_b).
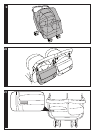
13 FOLDING: before folding the stroller, close
the hoods (if attached). To fold the stroller,
lift the buttons on the sides of the handlebar
(fig_a) and rotate the handlebar forward until
it clicks. Push the backrest and the hoods
towards the stroller and lower the handlebar
until it slots into its housing (fig_b). Ensure
the stroller is fully folded by checking
the safety fastener (fig_c). The stroller is
freestanding when folded up.
14 TRANSPORT: thanks to the carrying handle,
transporting the folded stroller is very simple.
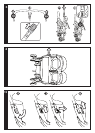
15 REMOVABLE LINING: to remove the stroller
lining, first remove the hoods, then the cover
on the side (fig_a). Push the pin upwards and
then outwards (fig_b), and finally slip it out of
the eyelet in the sack (fig_c). Do this on both
sides and in the middle.
16 To detach the sack from the seat, remove the
leg divider strap from under the seat (fig_a),
and unbutton it (fig_b). Unscrew the safety
harness from both sides (fig_c) and slip the
sack off the seat (fig_d).
GANCIOMATIC SYSTEM
Ganciomatic is the practical, fast system
for attaching the Primo Viaggio car seat to
the stroller. The car seat is fitted with the
Ganciomatic System, and is sold separately.
17 STROLLER GANCIOMATIC FASTENERS: To raise
the Ganciomatic fasteners on the stroller, pull
the sack up in the seat corners and lift the
two fasteners. They will automatically move
outwards (fig_a). To lower the Ganciomatic
fasteners, push them inwards and then down
(fig_b).
18 STROLLER + CAR SEAT: To fasten the car seat
to the stroller: set the brake on the stroller,
remove the hood, completely lower the
backrest and raise the Ganciomatic fasteners.
Place the car seat, facing the adult, on the
stroller and push down until it clicks into
place. Do not remove the front bar from the
stroller when attaching the car seat. See the
car seat’s user manual for instructions on
how to detach it from the stroller.
ACCESSORIES
19 RAIN COVER: transparent rain cover for the
ARIA TWIN 60-40 stroller.
20 CHANGING BAG: bag with pad for changing
the baby. Can be attached to the stroller.
SERIAL NUMBERS
21 The information about the date of production
of ARIA TWIN 60-40 is indicated under the
seat.
_ Product name, date of manufacture and serial
number of the product.
This information is essential in the event of
any complaints.
CLEANING AND MAINTENANCE
PRODUCT MAINTENANCE: protect from the
weather: water, rain, or snow; prolonged
and continuous exposure to bright sunlight
may give rise to colour changes of various
different materials; store this product in a dry
place.
CLEANING THE CHASSIS: periodically clean all
plastic parts with a damp cloth. Do not use
solvent or similar cleaning products; keep
all metal parts dry to prevent rusting; keep
moving parts clean (adjustment mechanisms,
locking mechanisms, wheels, ...) and free of
dust and sand and, if necessary, lubricate with
light machine oil.
CLEANING THE RAIN CANOPY: wash with
a sponge and soapy water; do not use
detergents.
CLEANING FABRIC PARTS: brush fabric parts
to remove dust and wash by hand at a
maximum temperature of 30°C; do not wring;
do not use chlorine bleach, do not iron; do
not dry clean; do not apply solvent-based
stain removers and do not dry in a tumble