


- 11 -
EN_English
Thank you for choosing a Peg-Pérego
product.
WARNING
_ IMPORTANT: READ THESE
INSTRUCTIONS CAREFULLY
AND KEEP THEM FOR FUTURE
REFERENCE. FAILURE TO FOLLOW
THESE INSTRUCTIONS COULD PUT
THE CHILD’S SAFETY AT RISK.
_ THIS PRODUCT IS DESIGNED FOR
CHILDREN WHOSE MAXIMUM
WEIGHT IS 45 POUNDS (20 KG) AND
WHOSE MAXIMUM HEIGHT IS 43
INCHES (110 CM). THIS SHOPPER
BASKET IS DESIGNED TO CARRY A
MAXIMUM WEIGHT OF 11 POUNDS (5
KG). ANY CUPHOLDER EVENTUALLY
PROVIDED WITH THIS UNIT IS
DESIGNED TO CARRY A MAXIMUM
WEIGHT SPECIFIED ON THE
CUPHOLDER ITSELF. ANY POACH OR
POCKET PROVIDED WITH THIS UNIT
IS DESIGNED TO CARRY A MAXIMUM
WEIGHT OF 0.44 POUNDS (0.2 KG).
_ FAILURE TO FOLLOW
MANUFACTURER’S SPECIFICATIONS
OR USE OF ACCESSORIES OTHER
THAN THOSE APPROVED BY THE
MANUFACTURER MAY CAUSE THE
UNIT TO BECOME UNSTABLE.
_ AVOID SERIOUS INJURY FROM
FALLING OR SLIDING OUT. ALWAYS
USE COMPLETE 5 POINT SEAT BELT.
_ NEVER LEAVE YOUR CHILD
UNATTENDED.
_ ALWAYS USE ALL THE BRAKES
WHENEVER PARKED.
_ TO AVOID SERIOUS INJURY, WHEN
MAKING ADJUSTMENTS ENSURE
THE CHILD’S BODY IS CLEAR OF ALL
MOVING PARTS.
_ ALL OPERATING AND ASSEMBLY
PROCEDURES SHOULD BE
PERFORMED BY AN ADULT.
_ DO NOT LIFT THE STROLLER BY
GRIPPING THE FRONT BAR. THE
FRONT BAR IS NOT DESIGNED TO
WITHSTAND LOADS.
_ ENSURE THAT THE STROLLER IS
OPENED CORRECTLY AND LOCKED IN
POSITION OF USE.
_ CHECK TO MAKE SURE THAT THE
CAR SEAT OR THE BABY CARRIAGE
IS CORRECTLY FASTENED TO THE
STROLLER (WHERE APPLICABLE).
_ DO NOT DRIVE THIS PRODUCT
AROUND STAIRS OR STEPS; CARE
MUST BE TAKEN IF UNIT IS USED ON
STAIRS OR ESCALATORS.
_ DO NOT USE THE PRODUCT IF IT HAS
BROKEN OR MISSING PARTS.
_ DO NOT USE NEAR FIRE OR EXPOSED
FLAME.
_ NOTICE: THIS ARTICLE MEETS OR
EXCEEDS ALL REQUIREMENTS
COVERED IN ASTM F833 STANDARD
AND LATEST REVISIONS.
INSTRUCTIONS
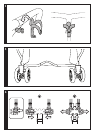
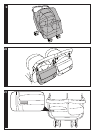
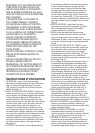
1 OPENING: to open the stroller, simultaneously
release the two fasteners (fig_a) and firmly lift
the handlebar (fig_b), before pushing it down
until the final click (fig_c).
2 FRONT BAR-CHILD TRAY: insert the front
bars (fig_a). The front bar and child tray are
independent, to meet the needs of any child;
it is possible to open one at a time or remove
one. To open the front bar-child tray on one
side only, push the button and pivot the front
bar outwards (fig_b). To remove the front bar-
child tray, first push the central button and
simultaneously lift the front bar; next push
the side button and simultaneously pull out
the front bar (fig_c). Do not place hot drinks
on the front bar-child tray as this could be
dangerous.
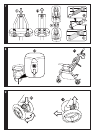
3 HOODS: the hoods are independent. One or
both may be lowered at any one time. Insert
the hood clips into the appropriate housing
(fig_a), button the hoods to the rear of the
backrests (fig_b) and open by pulling forward
(fig_c). To remove the hoods, push the side
buttons and simultaneously slip the hood
upwards (fig_d).
4 CUP-HOLDER: to attach the cup-holder to
the centre of the handlebar, place it in the
appropriate housing, as in the figure.
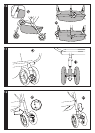
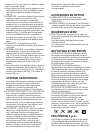
5 BRAKE: Press down on the brake lever
situated on the rear wheel unit to set the
brake on the stroller. Lift the lever to release
the brake. Always set the brake when the
stroller is at a standstill.
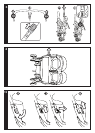
6 5-POINT SAFETY HARNESS: to fasten, insert
the two waist strap buckles (with shoulder