


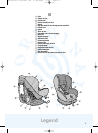

Instructions for use
• The design of the cover may differ.If the cover on your seat has Velcro on the side seam on the back (28), you can
leave the entire belt system in place in the shell. You only need to open the Velcro and then follow the instructions for
removing the cover.
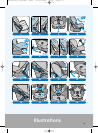
Removing the cover and belt pads
• Make sure that the seat buckle is locked in order to prevent the belts from twisting.
• The belt clamping handle must be locked, i.e. positioned against the base.
• Loosen the shoulder belts. See "Adjusting the height of the shoulder belts".
• Place the Priori XP in the sleeping position and open the belt guard door (29).
• Remove the shoulder belts from the belt yoke (30).
• Tilt the clasp on the belt pad and pull it together with the shoulder belt through the belt slots. This is easiest to do in
the uppermost vertical section (31).
• Remove both belt hooks by pushing the tab on the back of the seat downwards (32).
• Loosen the cover on all sides (33). Open the belt buckle.
• Pull the belts, belt pads, buckle sections and seat buckle through the openings in the cover.
• Now remove the cover. Important: Be careful when removing the cover around the edge of the release button (34).
• Slide the belt pads off the belts (35).
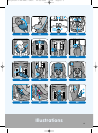
Replacing the cover and belt pads
• First slide both buckle sections together and lock into the belt buckle.
• Slide the shoulder belts through the clean belt pads ensuring that the textured side of the belt pad is facing
downwards. Push the shoulder belts through the large opening of the clasp. Important: Make sure the shoulder belts
are on top of the belt pad strap (36).
• Open the buckle and feed the buckle, shoulder belts and buckle parts through the openings in the cover (37).
• Place the cover over the edges of the release button and around the adjusting handle and secure it onto the cover
pins (38).
• "Click" both belt hooks into position (39) and check to make sure they are securely fastened.
• Secure the shoulder belt clasps in the belt slots at the desired height (40/41).
• Attach the shoulder belts to the belt yoke. Important: The red stitching on the shoulder belts and belt yoke must be
facing the shell (42). If not, this means the belts are twisted.
• Close the belt guard door (43).
• Fasten the belt buckle and close the flap on the cover (44) and check the functioning of the adjustment system.
Checklist
Read through this checklist before every journey!
• Check to make sure the Priori XP is securely fastened with the seat belt and that the clamping handle is locked.
• Check to make sure the shoulder belts are at the proper height.
• Check to make sure your child is fastened securely and that the buckle is locked properly.
• Check regularly that the belt in the Priori XP is not damaged. If it is damaged, do not use the car seat under any
circumstances and contact your supplier or importer (see address list on the back of the instruction manual).
• If you have any questions, please contact your supplier. Make sure that you have the following details on hand:
- Serial number at the bottom of the orange sticker (on the back of the Priori XP).
- Make and type of vehicle and seat on which the Priori XP is being used.
- Your child’s age and weight.
Handy tips
• The belt tensioner does not open: Place the shell in the sleeping position first.
• The child sits on the belts when placed in the Priori XP: Drape the belts over the belt hooks and hook belt pad over
lip by release button.
11
GB
gba-priori-1-xp-HAE..-bw 17-06-2005 11:04 Pagina 11