


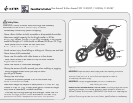

To recline seat
To fully recline, unhook buckle on back of the seat.To adjust the recline position;
adjust the slide on the strap to the desired length.
WARNING:
Child may slip into leg openings and strangle. Never use in a
reclined carriage position unless T-shield and shoulder strap have been
readjusted to the new seat position.
Storage and folding
WARNING:
Always remove child from stroller before folding
Pull the back of the seats forward. It will be easier to fold if the seats are not in
the recline position. Remove locking pins from side latches on the stroller frame
(Double Models have 2 locking pins). Release the two latches from the frame. The
the recline position. Remove locking pins from side latches on the stroller frame
(Double Models have 2 locking pins). Release the two latches from the frame. The
the recline position. Remove locking pins from side latches on the stroller frame
stroller may automatically begin to fold, the front wheel will fold under frame and
(Double Models have 2 locking pins). Release the two latches from the frame. The
stroller may automatically begin to fold, the front wheel will fold under frame and
(Double Models have 2 locking pins). Release the two latches from the frame. The
the handle will fold backwards. For a more compact fold remove front and rear wheels
stroller may automatically begin to fold, the front wheel will fold under frame and
the handle will fold backwards. For a more compact fold remove front and rear wheels
stroller may automatically begin to fold, the front wheel will fold under frame and
Storage and folding
Storage and folding
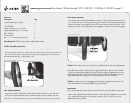
Front Fender Assembly
Insert the #8 – 1.5" screws into the holes located on the front support above
the wheel. Align the holes on the bottom side of the fender with the screws and
Insert the #8 – 1.5" screws into the holes located on the front support above
the wheel. Align the holes on the bottom side of the fender with the screws and
Insert the #8 – 1.5" screws into the holes located on the front support above
tighten with a Phillips screwdriver.
Parent Console Attachment
(not included with KS107)
The parent console will attach to the handle by snapping it in place
on the handle and above the canopy.
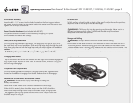
Tether/Wrist Strap Attachment
The wrist strap has different sized loops. The large loop will go on your wrist;
the small loop will be on handlebar. Slide end with large loop through the small
loop, then grasp the end with the large loop and pull strap to tighten on handlebar.
Caution
:
Whenever child is in stroller always use the wrist strap. Before you remove
the wrist strap from your wrist make sure you fi rst engage the rear brakes.
Whenever child is in stroller always use the wrist strap. Before you remove
the wrist strap from your wrist make sure you fi rst engage the rear brakes.
Whenever child is in stroller always use the wrist strap. Before you remove
To Engage Rear Brakes
Step on the levers next to the rear wheels until the cogs of the brakes engage the
cogs of the wheel. Repeat on other side. To release brake, lift levers using your
Step on the levers next to the rear wheels until the cogs of the brakes engage the
cogs of the wheel. Repeat on other side. To release brake, lift levers using your
Step on the levers next to the rear wheels until the cogs of the brakes engage the
toe until cogs disengage.
To Operate Front Caliper Brake:
The front brake operates the same as a bicycle hand brake. Squeeze lever
located on handlebar to engage front brake. Release lever to disengage.
The front brake operates the same as a bicycle hand brake. Squeeze lever
located on handlebar to engage front brake. Release lever to disengage.
The front brake operates the same as a bicycle hand brake. Squeeze lever
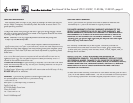
PROPER USE OF SEAT BELTS & SHOULDER STRAPS
WARNING:
Avoid serious injury from falling or sliding out.
Always use seatbelt.
Place child in seat. Make sure T-shield is between the child’s legs.
When child is seated, place shoulder straps over the child’s shoulders.
Slide waist straps through lower loops of shoulder straps, bring lap belt
ends together and clip into place around child’s waist. Adjust waist and
shoulder straps for snug fi t.
ends together and clip into place around child’s waist. Adjust waist and
shoulder straps for snug fi t.
ends together and clip into place around child’s waist. Adjust waist and
Operating Instructions
Run Around
™
& Run Around
™
LTD 11-KS107, 11-KS186, 11-KS187...page
3