


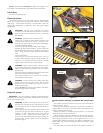
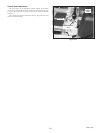

Belts
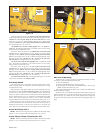
Inspect belts frequently for wear and serviceability. Replace a belt that
shows signs of severe cuts, tears, separation, weather checking and
cracking, or burns caused by slipping. Slight raveling of belt covering does
not indicate failure, trim ravelings with a sharp knife.
WARNING: If the pump belt fails, loss of control will occur
especially when operating on a slope. If you lose steering
control while operating the machine, place the steering
control levers in the park brake position immediately.
Inspect the machine and involve your Hustler dealer to
resolve the problem before continuing to operate.
Inspect the belt pulley grooves and flanges for wear. A new belt, or one
in good condition, should never run against the bottom of the groove.
Replace the pulley when this is the case, otherwise belt will lose power and
slip excessively.
Never pry a belt to get it on a pulley as this will cut or damage the fibers
of the belt covering.
Keep oil and grease away from belts, and never use belt dressings. Any
of these will destroy the belt composition in a very short time.
Mower blade maintenance
Check the mower blades daily, they are the key to power efficiency and
well groomed turf. Keep them sharp, a dull blade will tear rather than cut
the grass, leaving a brown ragged top on the grass within a few hours. A
dull blade also requires more power from the engine.
Replace any blade which is bent, cracked or broken.
WARNING: Never attempt to straighten a bent blade by
heating, or weld a cracked or broken blade as the blade may
break and cause serious injury. Replace worn or damaged
blades.
DANGER: Never work with blades while engine is running
or deck clutch switch is engaged (on). Always place deck
clutch switch in the disengaged position, place control levers
in the park brake position and turn engine off and disconnect
negative battery cable. Block up mower when you must
work under it. Wear gloves when handling blades. Always
check for blade damage if mower strikes rock, branch or
other foreign object during mowing!
WARNING: Always wear adequate eye protection when
grinding mower blades.
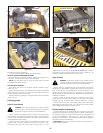
Mower blade removal
Use a 15/16" wrench to remove the 5/8" cap screw holding the blade to
the spindle shaft from underneath.
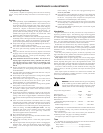
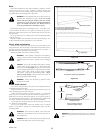
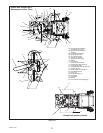
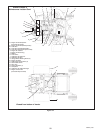
Sharpen the blades on a grinder following pattern as shown (Fig. 4-8).
Touch-up sharpening can be done with a file.
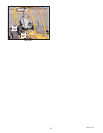
Check the blades for balance following grinding. A commercial
balancing tool is available through most hardware supply stores, or
balancing can be done by placing the blade on an inverted line punch or
1/2" bolt. Blade should not lean or tilt. Spin the blade slowly, blade should
not wobble. If blade is out of balance, true it up before reinstalling.
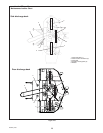
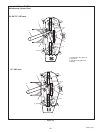
Lay the blade on a flat surface and check for distortion (Fig. 4-10 and 4-
11). Replace any distorted blade.
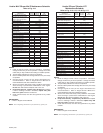
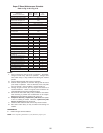
Do not re-use spindle bolts which have stripped, worn or undercut
threads. Torque bolts on spindles to 118 foot-pounds (160.0 Nm) when
reinstalling blades.
WARNING: When mounting blades, rotate them after
installation to ensure blade tips do not touch each other or
sides of the mower.
WARNING: Failure to correctly torque the bolt may result in
the loss of the blade which can cause serious injury.
WARNING: Mower blades are sharp and can cut. Wrap the
blade(s) or wear gloves and use extra caution when servicing
them.
Warped Blade (Replace)
Straight Blade
Comparison of Warped and Straight Blades
Cutting
Plane
Figure 4-10
Figure 4-11
Twisted Blade Edge
(Replace)
Cutting Edge
Straight Blade Edge
End view of blades, comparing
twisted and straighten blades.
Cutting Plane
Cutting Edge
Figure 4-9
Resharpening Pattern
Do not sharpen to original pattern (below).
It is easier to get a straight cutting edge following
the resharpening pattern shown above.
Original Edge
600876_0706
23