


SKU 95041 For technical questions please call 1-800-444-3353. Page 4
5. To close and lock the Key Box: Close the door and turn the Knob in the opposite direction
used to open the Key Box. Pull the door gently to make certain it is properly locked.
6. Installing batteries: The red LED light on the Keypad (7) will light up when the batteries
need replacing. When this light appears, IMMEDIATELY replace the batteries.
Open the Safe door. Unsnap the Battery Cover (10) from the Door. Remove the old
batteries and install four new “AA” batteries in their place in the battery compartment. Make
certain to align the polarity of the batteries as indicated in the battery compartment. Snap in
the Battery Cover (10).
7. After replacing the batteries, the PIN may need to be reset. To reset PIN, follow instructions
in Step 2 on page 3.
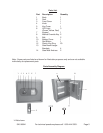
8. Mounting the Key Box: To mount the Key Box to a wall or surface, use a drill to set the path
for each Bolt (9). Make certain that the drilling path is clear and free of obstacles
such as wires, cables and electrical lines. Use wall anchors (not included) as
necessary. Insert the Bolts (9) (included) through each drilled hole and into a stud to
secure the Key Box to the desired surface.
9. The Key Box comes with four Steel Hook Hanger Brackets (13). These come in four colors
to match the Plastic Key Hanger Rings which also come in (4) colors.
10. Install the Steel Hook Hanger Brackets (13) either onto the slots on the inside of the Key Box,
the Door or both. The four Steel Hook Hanger Brackets are numbered 1 through 20. Once
the Steel Hook Brackets are installed, the Plastic Key Rings (12) can be hung on them. The
Plastic Key Rings can be set to correspond to either the number or color of the Steel Hook
Hanger Brackets (13).
Maintenance
1. Protect the Key Box from moist or wet conditions. Moisture may cause electronic damage in
the keypad or corrosion of the steel.
2. Occasionally wipe the Key Box and keypad clean with a soft dry cloth or brush.
3. Occasionally apply a small amount of light oil or lock lubricant to the mechanical lock
mechanism. Be careful not to get any oil or other liquids on or near the electronic
mechanism.
PLEASE READ THE FOLLOWING CAREFULLY
THE MANUFACTURER AND/OR DISTRIBUTOR HAS PROVIDED THE PARTS DIAGRAM IN THIS MANUAL AS A
REFERENCE TOOL ONLY. NEITHER THE MANUFACTURER NOR DISTRIBUTOR MAKES ANY REPRESENTATION OR
WARRANTY OF ANY KIND TO THE BUYER THAT HE OR SHE IS QUALIFIED TO MAKE ANY REPAIRS TO THE PRODUCT
OR THAT HE OR SHE IS QUALIFIED TO REPLACE ANY PARTS OF THE PRODUCT. IN FACT, THE MANUFACTURER AND/
OR DISTRIBUTOR EXPRESSLY STATES THAT ALL REPAIRS AND PARTS REPLACEMENTS SHOULD BE UNDERTAKEN BY
CERTIFIED AND LICENSED TECHNICIANS AND NOT BY THE BUYER. THE BUYER ASSUMES ALL RISK AND LIABILITY
ARISING OUT OF HIS OR HER REPAIRS TO THE ORIGINAL PRODUCT OR REPLACEMENT PARTS THERETO, OR ARISING
OUT OF HIS OR HER INSTALLATION OF REPLACEMENT PARTS THERETO.