


Page 3For technical questions, please call 1-800-444-3353.SKU 42619
ASSEMBLY
Read the ENTIRE IMPORTANT
SAFETY INFORMATION
section at the beginning of this
document including all text under
subheadings therein before set up
or use of this product.
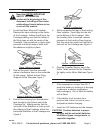
Locate the Main Wing and Fuselage. 1.
Remove the tape covering on the center
of the Fuselage. Adhere the Wing to the
Fuselage making sure that the center of
the Wing lines up with the center of the
Fuselage. Use a small pin or apply slight
pressure to hold the wing in place until
the adhesive is tightly in place.
Figure 1-Wing to Fuselage
Wing
Support
2. Peel off the cover from the two small
pieces of adhesive tape on the underside
of both wings. Adhere the two Wing
Supports to the Wing-see Figure 1.
Figure 2 -Stabilizer to Fuselage
3. Peel off the covering from the adhesive
tape located on the bottom side of the
Fuselage Tail. Making certain that the
mid point of the Stabilizer is lined up with
the midpoint of the Fuselage, attach the
Horizontal Stabilizer to the Fuselage-see
Figure 2.
Figure 3 - Landing Gear
4. While squeezing the legs of the Landing
Gear together, insert legs into the slot
on the bottom of the Fuselage. After
the Landing Gear is inserted, release
pressure on the Landing Gear Legs so
that they snap into place and are held in
their slot on the Fuselage-see Figure 3.
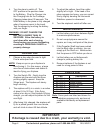
Figure 4 - Propeller to Motor
5. Plug the Propeller Spinner set on the
Motor. Make certain that the Propeller
ts tightly on the Motor Shaft-see Figure
4.
CHARGING
If the temperature is lower than 55° F, 1.
warm the battery by holding it or bringing
it indoors to a warmer temperature
before charging. Do not heat the battery
with a ame.
If the battery is hot or warm from 2.
previous use, allow it to cool to room
temperature before charging.
Insert two ‘AA‘ batteries into the charger. 3.
CAUTION! Position batteries in proper
polarity and do not install batteries
of different types, charge levels, or
capacities together.
REV 09k