


5
749-12-97
867
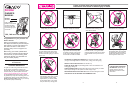
To Unpack Stroller
Step 1.
Flatten stroller carton to
protect floor.
Step 2.
Open stroller on
carton as shown
until latched.
PARTS LIST
CHECK that you have all the parts listed below
BEFORE assembling your stroller.
If any parts are missing, call Customer Service
at 1-800-345-4109.
THIS PRODUCT REQUIRES ADULT ASSEMBLY.
No tools required for assembly.
Handle
with
wire
Pin (4)
Frame
Front wheel assembly
without brake (2)
Flattened
carton
Latch
Rear wheel assembly
with brake (2)
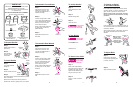
To Install Handle
Step 1.
Turn handle brackets
straight up.
Step 2.
Position handle as shown.
Step 3.
Place both sides of handle into brackets and push
down until latched.
NOTE: Be sure buttons are securely latched in
bracket holes. Check by pulling firmly up on handle.
Handle
bent
towards
rear
Handle
bracket
Insert pin
Push
wheels up
To Adjust Back
Step 1.
Push back of seat slightly
forward while squeezing wire
to unlock, as shown.
Step 2.
Adjust to desired position.
Step 1.
Snap swivel lock button onto
wheel mount as shown. This
must be done BEFORE pin is
inserted (next step).
Step 2.
Insert pin through hole in wheel
mount. Then push round end
of a rear wheel assembly (with
brake) up onto pin as shown
until it snaps into place.
NOTE: Check wheel attachment
by pulling down on rear wheel
assembly.
Step 3.
Repeat above steps for other
side.
To Assemble Rear Wheels
Handle
without
wire
OR
To Unfold Stroller
Step 1.
Unfold footrest from under
armrest.
Step 2.
Release storage latch.
Step 3.
Unfold as shown.
Be sure frame
is latched before allowing
your child near the stroller.
To Use Brakes
Always apply
both brakes to park stroller.
Push DOWN to park.
Lift UP to stroll.
Swivel lock button (4)
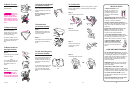
To Secure Your Child
Avoid serious
injury from falling or sliding
out. Always use seat belt.
Step 1.
Place crotch strap between
childs legs and snap both side
buckles to the center buckle.
Adjust belt as needed to get a
snug fit around your child.
Step 2.
Push in on front of buckle to
release.
Step 1.
Snap swivel lock button onto
wheel mount as shown. This
must be done BEFORE pin is
inserted (next step).
Step 2.
Insert pin through hole in wheel
mount. Then push round end of
a front wheel assembly (without
brake) up onto pin as shown
until it snaps into place.
NOTE: Check wheel attachment
by pulling down on the front
wheel assembly.
Step 3.
Repeat above steps for the
other side.
Insert pin
Push
wheels up
To Assemble Front Wheels
Round
end
Round
end
To Change to Swivel
or Non-swivel Wheels
For smooth travel, always lock both rear swivels
(closest to handle). On uneven surfaces such as
grass, stones or gravel, lock all four swivels.
Before locking swivels, push stroller forward a
few feet to ensure that the wheels are correctly
positioned.
Push buttons up or down, depending on model, to
lock or release swivels. Turn swivel to check that it
is locked or released.
When reversing position of the handle, check that
rear swivels are locked and front swivels are
released.
Direction of
travel
When reversing
handle, push
stroller forward,
then lock rear
wheels and release
front wheels.
LOCK
Direction of
travel
LOCK
Boot
(on certain models)