


9
808-9-98
10 11 12
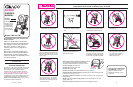
To Use Boot (on certain models)
Step 1.
Put seat back into any position
except fully reclined. (For fully
reclined carriage position, see
below.) Set footrest at seat
height and snap arm bar into the
extended position. CHECK that
footrest is secure at seat height
by pressing down on it. If not,
adjust metal bar under footrest.
Place boot under the footrest.
Slide it over footrest and arm bar
as shown.
Step 2.
Fasten snaps at top and bottom
corners of the boot to padding at
each side.
If seat is being used in fully reclined carriage position,
close off leg opening as described in To Adjust
Footrest before placing boot on stroller.
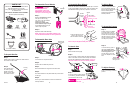
To Change to Swivel
or Non-swivel Wheels
Front swivel wheels lock for use on uneven surfaces such
as grass, stones or gravel.
Before locking swivels, first push stroller forward a few
feet to ensure that the wheels are correctly positioned.
Slide DOWN for swivel. Slide UP for non-swivel.
To Use Brakes
Always apply brakes when parking
stroller.
Push brake levers DOWN
to park.
Lift brake levers UP to stroll.
To Secure Your Child
Avoid serious injury from falling or
sliding out. Always use seat belt.
Step 1.
Place crotch strap between legs
and fasten both belt buckles
together.
Step 2.
Adjust belt at both buckles as needed to get a snug fit
around your child.
Step 3.
Squeeze sides of buckles to
release.
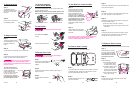
To Adjust Arm Bar
Step 1.
To release the arm bar,
squeeze the latches under
the arm bar on both sides
as shown.
Step 2.
Pull arm bar out until it clicks
into extended position.
To Adjust Footrest
Step 1.
To lower the footrest, first lift
the footrest slightly, then pull
down the metal bar as
shown.
Step 2.
To raise footrest to seat height, lift up the metal bar.
Step 3.
If seat is being used in the fully reclined carriage
postion, you must close off the leg opening.
Child may slip into leg openings and
strangle. Never use in reclined carriage position
unless footrest is completely raised and locked into
position as shown.
To close off leg opening:
With arm bar extended, raise
footrest completely and
push footrest bar down
to lock it in place. Then snap
arm bar into normal (non-
extended) position. Arm bar
must SNAP into position, not
just press against footrest.
Arm bar IN
Footrest
LOCKED
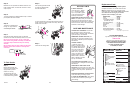
Step 3.
Unhook the small elastic loops from the two plastic tabs
found under the footrest.
Step 4.
Turn seat right side up. Put footrest down. Remove arm
bar. (See To Adjust Arm Bar instructions.)
Step 5.
Unbuckle the seat belt. Carefully remove covering from
seat frame. Please note to:
!
Pull crotch strap out of slot in covering.
!
Pull webbing strap and D rings out of slots in the
!
seat frame.
Step 6.
Crotch strap may also be removed for washing. Under
the seat frame, push the plastic crotch strap retainer
through the slot in the frame to remove it.
To Remove Seat Covering
Seat covering may be removed for washing.
Step 1.
Turn seat upside down. Unsnap VELCRO
®
at sides of the seat
to release side flaps. Unsnap two snaps at bottom of seat
back and release elastic straps from bar.
Step 2.
Unfasten webbing strap from D
rings under the seat.
Snaps
To Reattach Seat Covering
To reattach the seat covering, reverse the previous steps.
Step 1.
Slide back part of covering
over rear of seat frame. Be
sure back part of covering
slides behind, not over, the
side panels of the seat.
Step 2.
Replace all straps:
!
Push webbing strap and
!
D rings through slots in
!
the seat frame as shown.
!
If needed, reattach crotch
!
strap by pushing lower
!
plastic crotch strap retainer
!
through slot in seat frame.
!
Push crotch strap through
!
slot in seat covering.
Step 3.
Fit sides of covering over side panels of seat. Push
covering down into seat.
Fit covering behind
side panels