


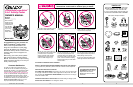


6 7 85
651-3-00 651699
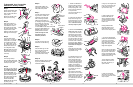
1. Thread cord attached to
dog phone through the two
holes found on each of the
three people figures. Insert
end of cord into small hole
on tray as shown.
Tie a knot under the tray to
hold cord in place.
2. Push three rings past the
bumps onto the ring loop,
and insert ends of ring loop
into the two holes in tray as
shown. Push down firmly
until loop snaps in place.
3. Remove and immediately
discard the plastic pull tab
on the printed circuit board.
Attach three music buttons
over circuit board in music
lid. For each button, first put
front end of button into lid so
tooth fits into slot in lid, then
push down back of button so
it snaps onto pegs. Check
that both front and back of
each button are snapped
in place.
Snap pegs of lid into holes
at both sides of the storage
compartment in tray.
4. Assemble the house. Put
lower pivot pin of door into
hole in house base. Align
roof over base so upper pin
of door fits into hole at side
of doorway. Holding pieces
together, turn assembly
upside down, locate the four
screw holes, and fasten with
four screws. Do not over-
tighten screws.
After house is assembled,
align house over round ends
of tray halves so mirror faces
center of tray. Insert base of
house into the four slots, and
turn clockwise until house is
latched to tray.
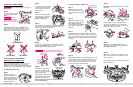
To Assemble Your Convertible
Entertainer
®
Activity Center
Step 1.
Position three stands under
base as shown, and push
down on base until stands
snap in place.
Stands can fold flat under
base to permit rocking.
Step 2.
With notch at bottom of
upper leg as shown, push
in the button on front of
each lower leg and insert
an upper leg section until it
snaps into one of three
heights for infant use. Set all
three legs to same height.
Step 3.
Turn two halves of tray
upside down. Put the end
of tray with an A printed
on it inside the end with a
B. Fasten ends A and
B to each other with four
Phillips head screws. Do
not overtighten screws.
Snap the other two ends of
tray together so it forms a
closed circle in the center
of the tray.
Step 4.
Turn tray right side up.
Push five large plastic bolts
into the five holes as shown
until they snap in place.
Step 5.
Place tray on top of legs so
that snapped ends of tray
are in front of the Graco
®
name on the base, and
bolt in circle at back of tray
goes into back leg on the
base. Align other two bolts
with holes in the legs.
Fasten all three bolts.
Check that bolts are secure
by pulling up on tray.
Step 6.
Place folded Toddler Unit
Conversion Instructions into
clear plastic seat pocket.
Step 7.
Put cloth seat inside the seat
ring as shown. Toddler Unit
instructions must face high
side of seat ring as shown.
Attach seat to the seat ring
by wrapping top edge of seat
around seat ring. Under the
seat ring, snap the grommets
onto the pegs as shown.
Tuck the seam on both sides
of the cloth seat between the
outside of the ring and the
plastic partitions as shown.
Check that edge of cloth
seat does not cover
wheels or partitions.
Step 8.
Turn the seat over and push
seat down into the seat ring.
Step 9.
Snap the seat ring onto the
tray. Push down all around
seat to make sure it is
completely snapped onto the
tray. Seat must turn freely.
Toddler Unit
instructions
Grommet
5. Align cup over largest hole
in tray so cup handle is next
to the house. Snap pins of
cup into holes in tray.
6. Snap together the two
halves of ball holder as
shown. Spread ends apart
and attach ball by inserting
two pins on ball holder into
holes in ball.
Holding ball/ball holder
assembly together, push
holder down into tray as
shown until it snaps in place.
7. Cut out the double-sided
pictures from included artwork,
or use your own pictures.
Insert a picture into smaller
half of each clear plastic
page, then snap small and
large halves together.
Insert one peg of each page
into one of the three holes in
tray as shown. Insert other
peg into corresponding hole
in plastic page retainer. Snap
retainer into slots in tray.
To open pages to replace
pictures, insert a coin into
the center slot and pry it
open as shown.
8. Push end of butterfly
wand firmly into remaining
hole on tray as shown until it
snaps in place.
Bumps
Snapped
ends in front
Bolt in
circle
Back leg
High
side of
ring
Seam behind
partition
Step 10.
Refer to illustration below to attach
toys to tray. Detailed assembly
instructions follow.
Notch
PUSH