9
284-12-98
Do not install the toy gym
while your baby is in the
activity center.
CHECK that you have all
the parts listed below before
assembling your toy gym:
Step 1.
To mount beads on bar, flatten
ring at one end of bar as shown
and push through hole in center
of each bead.
Step 2.
Place ring on top of a
mounting post. Shorter teeth
must be on the bottom, as
shown. Top of mounting post
will be even with top of ring.
Snap cap into place inside
mounting post. Repeat with
the other ring, post and cap.
Step 3.
Mount posts onto front corners
of activity center tray as shown
until they snap securely into
place. Center of bar should
curve away from the seat, not
toward it.
Step 4.
Push wand into the square hole
at top of mounting post cap. Pull
on wand to be sure it is secure.
Repeat for other side.
Do not lift this
product by the toy gym.
Installing
the Toy Gym
(on certain models)
Bar and beads
Mounting post
and cap (2 each)
Teether
and
stalk
(2 each)
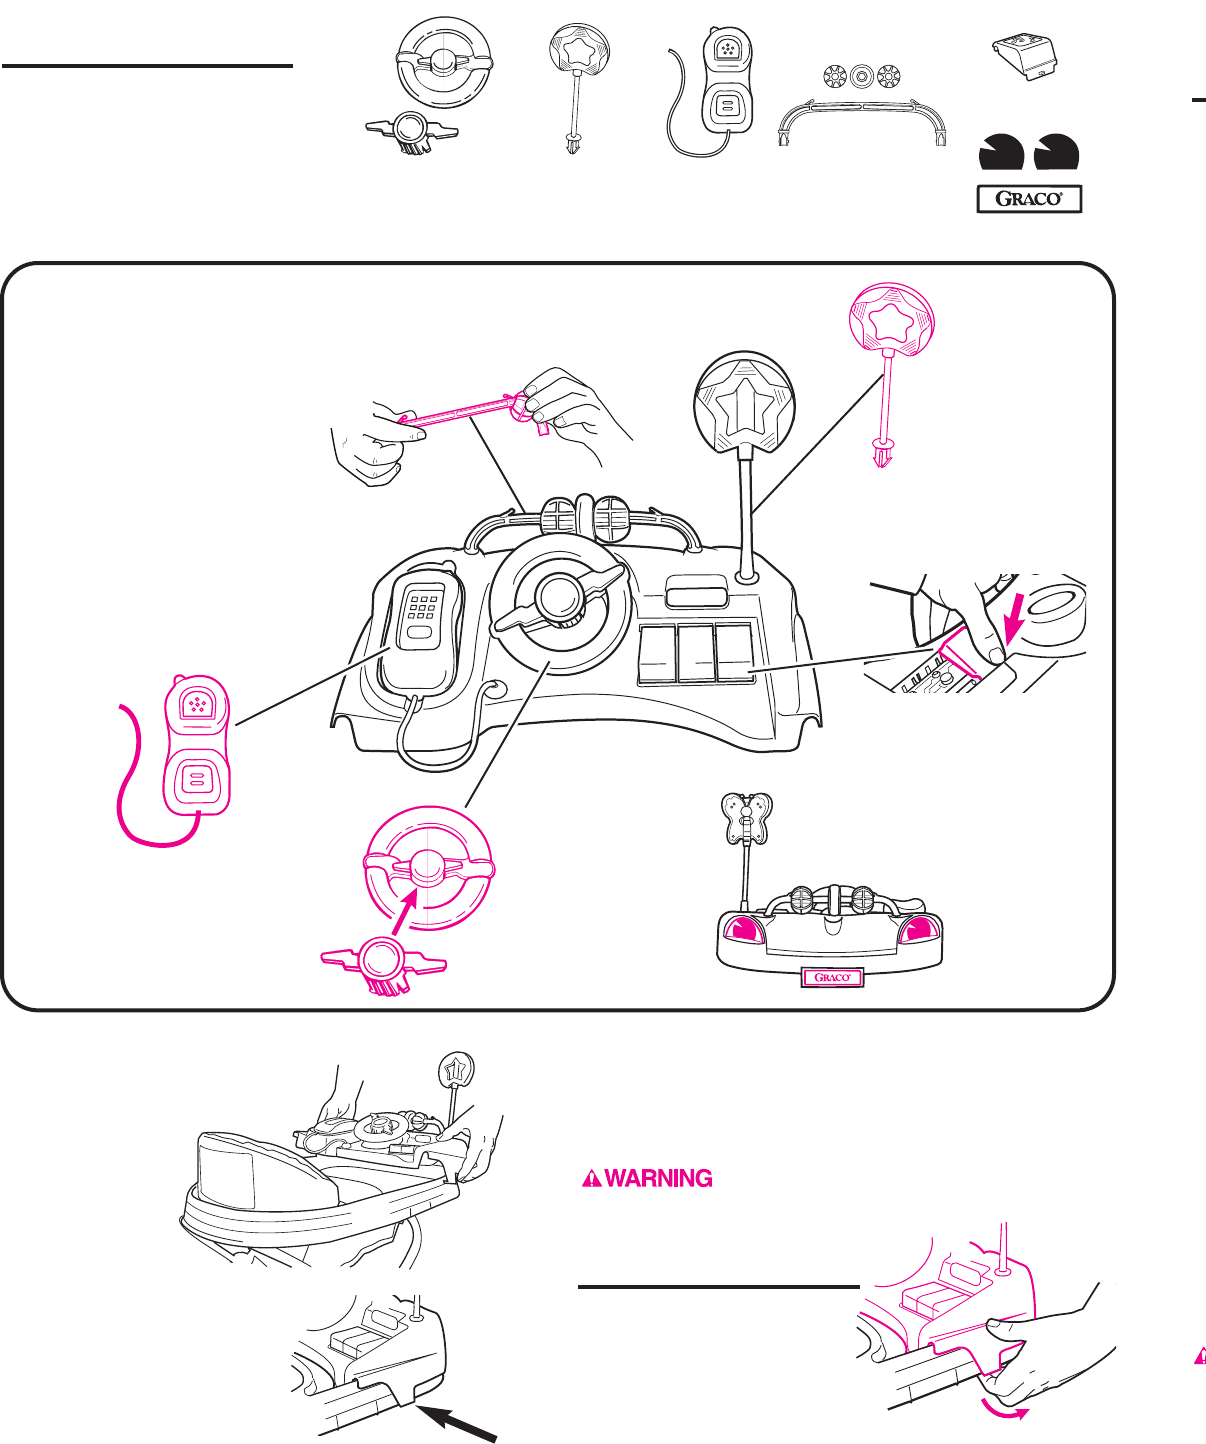
Installing the Playtray
(on certain models)
Step 2.
Line up front of playtray with
front edge of activity center
tray as shown.
Step 3.
Push playtray down so both
side tabs snap under the
activity center tray.
Bar, two beads,
one ring
Teether and
stalk (style
may vary)
Phone
and cord
Steering wheel
and cap
Do not install the playtray while
your baby is in the activity center.
CHECK that you have all the parts
listed at right before assembling your
playtray.
Push and twist the ring and
two beads onto the toy bar.
Snap the toy bar into the holes
in the playtray; slight curve in
toy bar must curve away from
steering wheel. Be sure both
ends of the toy bar are firmly
snapped into the playtray.
Once the toy bar is inserted into
the playtray, you will not be able
to remove it.
Push end of phone cord
through small hole in tray,
then tie a knot under the tray.
Pull on phone cord to make
sure cord is secure.
Push wheel cap
onto steering wheel,
then push assembly
into large hole in
tray. Check that all
four tabs go into
hole in tray.
Insert teether stalk into
the small square hole in
the tray.
Step 1.
Assemble the toys on the tray as shown.
Step 4.
CHECK that playtray is secure
on activity center by pulling up
on playtray.
Do not lift this
product by the playtray.
Removing the Playtray
To remove tray, pull the two
side tabs outward, and lift up
playtray.
Snap music keys in
place over the printed
circuit board.
10 11 12
Replacement Parts
Instructions for ordering activity center parts:
Complete form below. Your activity center model
number MUST be included on the form to ensure proper
replacement parts. Your model number can be found
on a sticker on the underside of the tray. Payment
must accompany your order.
Return the form below with payment to:
GRACO CHILDREN’S PRODUCTS INC.
CUSTOMER SERVICE DEPARTMENT
P.O. BOX 100, MAIN STREET
ELVERSON, PA 19520
IF YOU NEED HELP
If you have any questions, please call toll-free:
1-800-345-4109
Model Number
(Must be filled in)
SHIP TO:
Name
Address
City, State, Zip
( )
Telephone
Account #:
Expiration date:
Signature:
Tray
Cloth seat
Rear wheel
Seat rod/nut
Caster
Hardware
Pin
Parking stand
Toy gym
Playtray with toys
Parts List:
Tray .........................................
Cloth seat ................................
Rear wheel ..............................
Seat rod/nut .............................
Caster ......................................
Hardware .................................
Pin ...........................................
Parking stand* .........................
Toy gym* ..................................
Playtray with all toys* ...............
* Certain models only
Price:**
$ 15.00
$ 13.00
$ 8.00
$ 7.00
$ 5.00 (each)
$ 5.00
no charge
$ 5.00 (each)
$ 13.00
$ 20.00
** Prices subject to change without notice.
Stickers
Place three stickers on front of
tray as shown. Rub over
stickers with hand or clean
cloth to assure adhesion.
Shorter teeth
on bottom
Total:
Shipping
& handling: $5.00
6% sales tax
(PA only):
Total amount
due:
Check enclosed
(payable to Graco Children’s
Products Inc.)
Charge to credit card:
Visa
MasterCard
Discover
Music key (3)


