


5
231-3-99 IS3548
6 87
To Assemble Highchair
Step 1.
Hold front tube with ends up.
Place a foot (smooth side up)
at one curved corner of tube.
Insert a screw through tube
and into foot, then tighten.
Repeat with other corner,
then with both feet of rear
tube.
Step 2.
Lay seat face down on the
floor as shown. Insert
support tube through both
collars on bottom of seat.
Step 5.
Hold rear tube as shown.
Slide plastic brackets onto
upper tube.
Step 6.
Slide front tube onto upper
tube as far as it will go, until
the holes in the tubes line up.
Step 7.
Pull rear tube up until holes
in plastic brackets line up with
holes in the tubes.
CHECK that holes in upper
tube, front tube AND plastic
brackets all line up with each
other.
Step 8.
Insert a T-nut into one plastic bracket hole. It must pass
through both tubes, as shown in closeup below.
Insert a screw into other side of
plastic bracket and screw it into
the T-nut.
CHECK that tubes are
securely connected by
trying to pull them apart.
Repeat for other plastic bracket.
Set highchair upright.
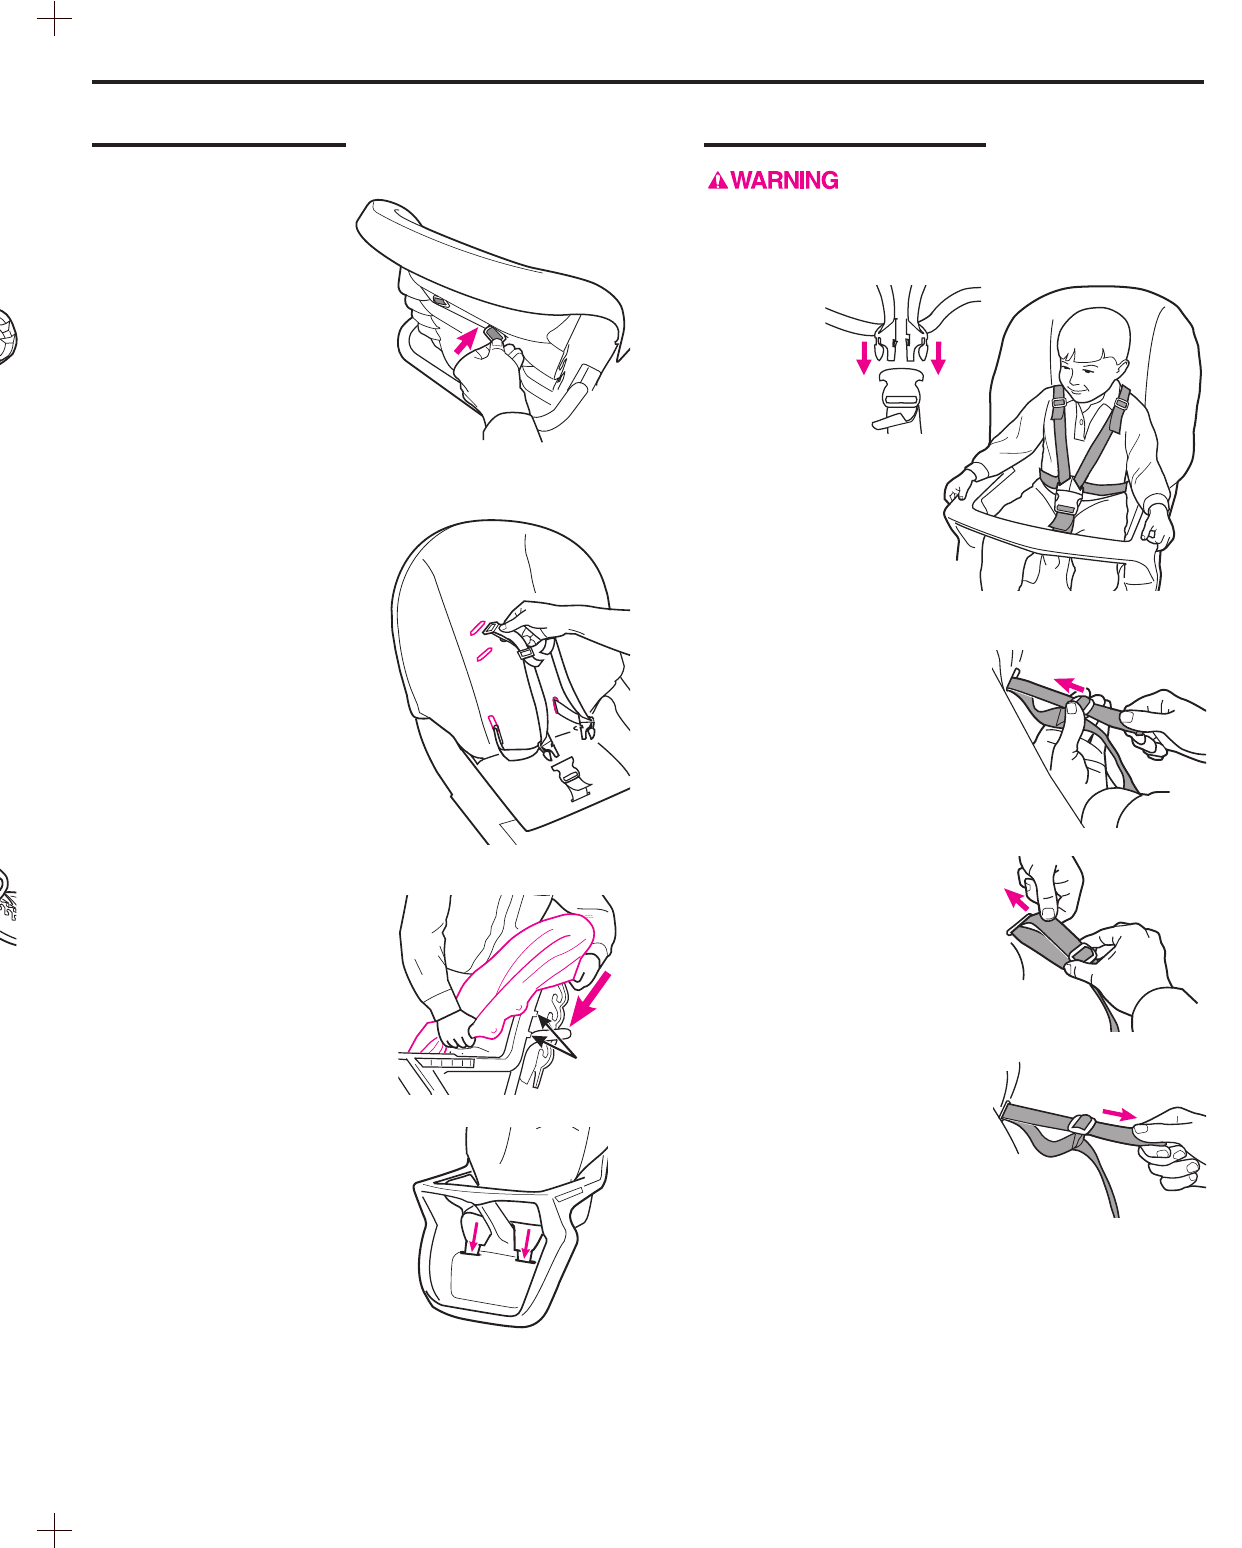
To Secure Your Child
Step 1.
Place your childs arms
through the loops created
by the shoulder/waist
straps and insert the
harness buckles into the
center buckle housing.
Step 2.
Adjust the shoulder and crotch
strap lengths as needed to get
a snug fit around your child:
!
To tighten shoulder straps,
hold free end of strap and
slide adjuster away from the
free end.
!
To loosen shoulder straps,
hold adjuster and pull strap
back through the adjuster.
Step 3.
Finish by giving a quick tug on
the free end until shoulder straps
are tight.
Check behind and in front of
seat to see that belt is tightly
threaded through retainers and straps are tight.
The position of the shoulder straps can be adjusted for
the size of your child. Locate the two plastic retainers
behind the seat back, push them through to the front
and move them to the higher or lower position as
desired.
Collars
Support tube
Both U
curves up
U curve
down
Plastic bracket
Step 3.
Insert recline bar into one recline bracket (brackets
have L and R on inside), with curved side of bar
toward the bracket. Then attach bar and both recline
brackets onto each end of the support tube as shown.
Step 4.
Insert both ends of upper
tube through holes in recline
brackets and pull all the way
through as shown.
Still holding ends of tube,
locate pegs. Push pegs
through the channel until
they pass the snap. Slide
pegs into first notch of
height-adjustment track.
Curved side of
recline bar
Pegs
First notch of
height-adjustment track
To Attach Seat Pad
Step 1.
Straps must be removed
from seat before pad can be
attached. Behind the seat
back, locate four plastic
retainers on shoulder and
waist straps. Push them
through the slots to the
front and set straps aside.
Step 2.
Place seat pad over highchair.
Step 3.
Push each retainer back
through proper hole in rear of
seat. Two levels of shoulder
holes are provided; choose the
level that is at or slightly above
your childs shoulders.
Avoid twisting straps.
Step 4.
Pull crotch strap and buckle
through center opening in seat
pad.
Step 5.
Attach seat pad by sliding
pocket over the back of the
seat as shown. Then hook
sides of pad over the two tabs
on each side of the highchair.
Step 6.
Push the two tabs on the
bottom of the seat pad into the
two slots in the bottom of the
seat as shown.
From the rear of the footrest,
pull the two tabs over the plastic
anchors near them.
If it later becomes necessary to launder or replace the
harness, follow the directions above to remove harness
straps from highchair.
Tabs
L bracket
R bracket
Insert at end
U curve up
Prevent serious injury or death from
falls or sliding out. Always secure your child in the
restraint. Do not depend on the tray alone to hold
your child.
5-POINT HARNESS MODELS (For waist belt models, see next section.)