


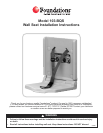

1
ADULT INSTALLATION REQUIRED.
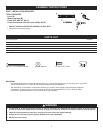
TOOLS REQUIRED:
Level (A)
Measuring tape (B)
P
ower drill with 3/8” bit (C)
Power screwdriver with bull nose phillips bit (D)
• READ ALL INSTRUCTIONS BEFORE ASSEMBLY OF WALL SEAT.
• Unpack carton and identify all parts.
ASSEMBLY INSTRUCTIONS
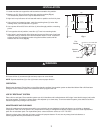
Parts Description Quantity
Hardware for installation:
1/4 - 20 x 1-1/4” Machine Screws 4
1/4” Flat Washers 4
1/2 -20 x 9/16” T-Nuts 4
1” Caps 4
PARTS LIST
1/4 - 20 x 1-1/4” Machine Screws
1/4” Flat Washers
1” Caps
1/2 -20 x 9/16” T-Nuts
•
The wall seat is no stronger than the anchors or walls to which they are attached and, therefore, MUST be firmly secured
in order to support the weight they are intended to support. Contact an architect or building contractor if any questions.
•
Check mounting hardware at least once a month to ensure screws are tightly fastened.
•
Always secure child with restraint system. NEVER leave child unattended.
•
DO NOT mount to a door.
WARNING
IMPORTANT:
- The enclosed hardware is for through-bolt mounting on a 1” thick steel partition only. If mounting unit on a partition
of different thickness or on a wall, provide the appropriate backing and hardware.
- Wall seat MUST be mounted in a convenient location at or near the same height as the toilet tissue dispenser.
If mounting in a changing room, mount so bottom of wall seat is approximately 20-1/2” from the floor. Make
sure there is adequate clearance in front of the seat for safe operation.
A
B
D
C