


Setup and Use
To prevent serious injury or death:
• Fall Hazard – It is dangerous to use
this reclined cradle on an elevated
surface, since child’s movement may
cause product to slide or tip over. Use
only on a floor.
• Suffocation Hazard – Never use on
a soft surface (bed, sofa, cushion),
since product can tip over and cause
suffocation in soft surfaces.
• Always use the restraint system.
• Never leave child unattended.
• Never use as a car seat.
• Never use as a carrier or lift while
child is seated. Never use the toy bar
as a handle.
• Not recommended for children who
can sit up by themselves (6 months
approximately, until 9 kg/ 20 lbs).
WARNING
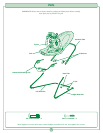
Restraint Belt
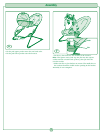
Securing your Child
• If the toy bar is attached, remove it before placing your
child in the seat. Place your child in the seat. Position the
restraint pad between your child’s legs.
• Fasten both restraint belts to the buckles on each side
of the restraint pad. Make sure you hear a “click” on both
sides.
• Check to be sure the restraint is securely attached by
pulling it away from your child. The restraint should
remain attached.
• Attach the toy bar, if desired (see Assembly step 7).
Restraint Pad
Buckle
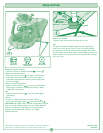
Calming Vibrations
• Make sure your child is properly secured in the seat.
• To turn vibrations on, slide the power switch on the
soothing unit to the on position .
• To turn vibrations off, slide the power switch on the
soothing unit to the off position .
IMPORTANT! If vibrations become faint, or if there are no
vibrations, remove the “D” (LR20) batteries from the soothing
unit and dispose of them properly. Replace the batteries with
four, new “D” (LR20) alkaline batteries.
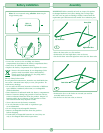
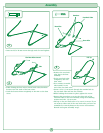
To tighten the belts:
•
Feed the anchored end of the belt up through the buckle
to form a loop
A
.
• Pull the free end of the belt
B
.
• Repeat this procedure to tighten the other belt.
To loosen the belts:
• Feed the free end of the belt up through the buckle to
form a loop
A
. Enlarge the loop by pulling on the end of
the loop toward the buckle.
• Pull the anchored end of the belt to shorten the free end
of the belt
B
.
• Repeat this procedure to loosen the other belt.
Note: After adjusting the belts to fit your child, make sure you
pull on them to be sure they are securely fastened.
Free End
Anchored End
Buckle
TIGHTEN
Free End
Anchored End
Buckle
LOOSEN
1
3
2
7