


6
DX-CRDRD
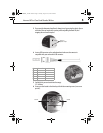
7 Connect your card reader's USB connector to a compatible USB connector on your
computer’s system board (See the illustration under step 4.)
8 Make sure that you have removed any tools or loose screws from inside your computer,
then replace your computer's cover.
9 Reconnect your computer's power cord, then turn on your computer.
Using the card reader
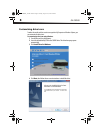
If your computer uses Windows, the correct driver is automatically installed and four new
drive icons appear in the My Computer and Windows Explorer windows. If you want to
customize the card reader drive icons, see" Customizing drive icons" on page 9.
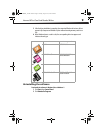
To access a media card using Windows:
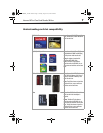
1 Insert a card into the appropriate slot, as shown in “Understanding card slot
compatibility” on page 7.
Caution: Cards must be inserted into the correct slot and in the correct direction. Failure to do
so may result in damage to your card and/or card reader.
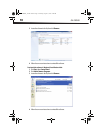
2 Open the My Computer or Windows Explorer applications, then double-click the drive
icon for the slot you are using.
3 To access files and folders on the inserted card, use normal Windows procedures for
opening, copying, pasting, or deleting files and folders.
4 When you have finished working with the files on a memory card, right-click the
memory card icon in My Computer or Windows Explorer and click Eject. The LED on the
memory card reader turns off after the card is removed.
Caution: Do not remove memory cards while the LED on the reader is flashing.
Understanding the LED indicator
The activity LED indicates when a slot is reading from or writing to a card.
• LED off—Your card reader is not being used.
• LED on—A card is inserted in one of the slots.
• LED flashing—Data is being transferred to or from a card.
DX-CRDRD_10-0881 EN.fm Page 6 Tuesday, August 31, 2010 4:02 PM