ST-800X User Manual 10 2007-03-07
/10:58
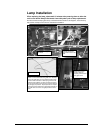
CH-750B Lamp
Unscrew and release
lamp wires from the main
PCB.
Unscrew grounding wire
from PCB.
Lamp is removed and replaced through the front of the
fixture. You must first remove the glass cover. Attempt to
remove the lamp after you have released all wire leads
from the PCB. Push back on both spring terminal ends
inside the lamp reflector to release the linear lamp from
the grip of both spring terminals and pull lamp outwards
as you apply the pressure. Repeat procedure to replace
and reconnect wire leads to the appropriate terminals on
the PCB. Make sure wires are tightly screwed onto the
PCB.
Remove the 4 corner
screws to allow the
temporary removal of the
safety glass cover.
Lamp Installation
When replacing the lamp, please wait 15 minutes after powering down to allow the
unit to cool down! Always disconnect from main power prior to lamp replacement.
Do not touch the envelope (glass area) of the bulb with bare hands. If this happens, clean the lamp
with alcohol and wipe it with a lint free cloth before installation.


