


8
8
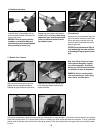
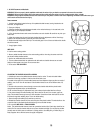
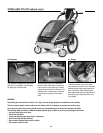
1.9 CX Drum Brakes (continued)
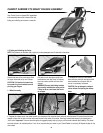
To ensure the carrier remains stationary
when parked, the CX carrier uses its drum
brakes as a parking brake. To activate the
CX parking brake, squeeze the hand lever
as tight as you can (pull the lever towards
the handlebars). While the lever is fully
squeezed push down the locking button.
Test for adequate parking brake activation
by pushing the carrier. There is nothing
wrong if the wheels slowly turn as you push,
but as soon as you release the carrier from
your grip the brakes should clearly exert
sufficient resistance to stop the carrier from
rolling. Check that this is the case both for-
wards and backwards. DO NOT USE THE
CARRIER and refer to the “Adjusting the
Brakes - Poor Braking” section if the carrier
rolls when released.
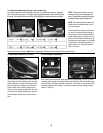
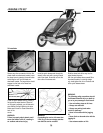
If one wheel is braking much stronger then
the other, an adjustment will be needed.
Minor differences in braking power
between the two wheels is acceptable. If
the left brake is stronger than the right,
adjust the right brake so that it brakes as
well as the left. Perform the opposite
adjustment if the right brake is stronger
than the left. To tighten a brake, follow
these steps.
After repeated use, the brakes will need to
be adjusted on account of cable stretch and
brake pad wear. If the left and right sides
are breaking evenly but not as effectively as
required, an adjustment needs to be per-
formed. First you need to locate the cable
guide inside the rear storage pouch located
behind the seat.
Adjustment 1: Turn this guide counter
clockwise threading the guide out of the
black casing. This adjustment should
improve the braking on both pads.
Parking Brake Adjusting the Brakes - Uneven Braking
Adjusting the Brakes - Poor Braking
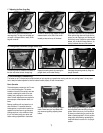
Make this adjustment with the wheels on
the carrier. If you can hear the brake pads
rubbing inside the hub on the wheel you will
need to turn the cable guide clockwise to
loosen the brake slightly. Once you are sat-
isfied with the braking, turn the nut clock-
wise so that the nut is secured to the black
casing. The nut will prevent the cable guide
from loosening. The cable guide will fall out
of the black casing if it is threaded out too
far. In this event, thread it back in a few
rotations and proceed to “Adjustment 2”.
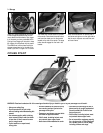
Adjustment 2: There is another cable
guide that can be adjusted on the hand
lever. Turn this guide counter-clockwise also
to increase the brakes effectiveness further.
Once adjusted be sure to tighten the small
nut as described in “Adjustment 1”. This
cable guide is also restricted in the amount
of adjustment. When the majority of the
guide has been threaded out proceed to
“Adjustment 3”.
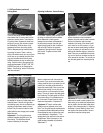
Adjustment 1: Turn the round cable guide
counter-clockwise so that the distance
between the guide and the brake increases.
Perform this operation with the wheel
installed on the carrier. If the wheel is diffi-
cult to install on or off the carrier, or if you
can hear the brake pads rubbing inside the
hub on the wheel, you will need to turn the
cable guide clockwise slightly to loosen the
brake. Once you are satisfied with the brak-
ing, turn the small nut clockwise so that the
nut is secured to the brake. The nut will pre-
vent the cable guide from loosening during
use.
Adjustment 3: Once no additional adjust-
ments can be made to cable guides on the
black casing or the hand lever, adjustments
can be made to the individual brakes them-
selves. Follow the explanation in “Adjusting
the Brakes - Uneven Braking” above, how-
ever perform the same number of turns to
each side to keep the braking equal.