


17
17
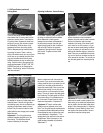
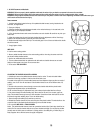
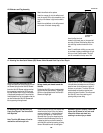
Wrap the Hitch Back-up Safety Strap
around the bicycle chainstay and attach the
safety clip to the D-ring on the hitch arm. If
the Hitch Back-up Safety Strap is not long
enough to wrap around the bicycle chain-
stay (because of a non typical rear triangle),
wrap it around the rear axle flange
(between the drop out and the wheel hub).
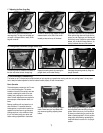
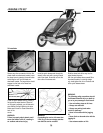
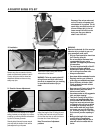
Place the CH-5 Hitch Ball into the Axle
Mounted Hitch Cup (inserted from the for-
ward open end). Fully insert the hitch ball
into the Axle Mounted Hitch Cup.
Remove any other conversion kits from the
wheel arm attachment bracket. Insert the
hitch arm by pressing the small button and
sliding the arm into the wheel arm attachment
bracket. The large button should engage into
the hole on the wheel arm attachment
bracket.
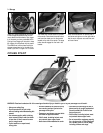
Insert the securing pin down through the
small rear hole in the wheel arm attachment
bracket.
4.4 Attaching Your Carrier to the Hitch
Cup on Your Bicycle
Failure to insert securing pin could
cause the carrier to separate from the
bicycle resulting in an accident and
serious injury.
Failure to properly attach the hitch back-
up safety strap could result in loss of
carrier and serious injury or death to the
occupants.
Do not use the hitch if you cannot properly
install the hitch back-up safety strap to
your bicycle. See your Chariot Dealer for
possible alternatives.
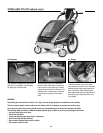
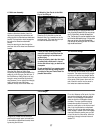
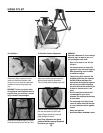
4.3 Hitch arm Assembly
The hitch arm can be stored on the side of
the carrier. The carrier must be fully upright-
ed to do so. Insert the long straight section
of the hitch arm into the bracket on the side
of the carrier. Slide the arm down until the
end of the hitch arm fits into the carrier’s
front wheel arm attachment bracket.
For a short distance on flat terrain, the hitch
arm can be rotated and used as a pulling
device. From a passenger’s perspective,
rotate the hitch arm 90 degrees counter-
clockwise. The strap should be pointing
towards the outside of the carrier. Push
down the small button on the hitch arm and
slide it into the left wheel arm attachment
bracket. You will not be able see the large
button engage, however check that engage-
ment has occured by making sure you can
not pull the arm from the carrier. Insert the
securing pin through horizontal hole as in
section 4.5.
Using the pin riveted onto the hitch arm,
push the pin through upper horizontal hole
in the wheel arm attachment bracket, there-
by securing the hitch arm.
4.5 Hitch Arm Storage
4.6 Pull Wagon
Place the Securing Pin through the holes on the
front of the Axle Mounted Hitch Cup so as to trap
the CH-5 Hitch Ball in the Axle Mounted Hitch
Cup. The Securing Pin must be installed from the
top of the Axle Mounted hitch cup. Pull the rubber
strap over the front of the Axle Mounted Hitch
Cup and over the securing pin end. The “Chariot”
logo should face forward.