


BURLEY STROLLER KIT OWNER’S INSTRUCTION AND SAFETY MANUAL 5
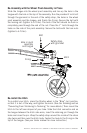
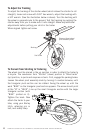
Re-Assembly with the Wheel Pivot Assembly in Place
Slide the tongue into the wheel pivot assembly and line up the hole in the
tongue with the hole in the top of the assembly. Run the provided 2 inch bolt
through the grommet in the end of the safety strap, the holes in the wheel
pivot assembly and the tongue, and finally the D-ring. Secure the bolt with
the locking nut (tighten to 6 ft-lbs). The end of the bolt should be flush or
completely pass through the end of the nut. Place the 1” bolts through the
holes on the side of the pivot assembly. Secure the bolts with the lock nuts
(tighten to 6 ft-lbs.).
D-ring
Hole in pivot
assembly
and tongue
Safety strap
with grommet
Bolt
Nut
Hitch
Re-install the Hitch
To re-install your hitch, place the Stroller wheel in the “Bike” (up) position,
so that it is out of the way, and tighten the knob. (See the following section
“Converting From Strollering to Trailering” for more details.) Then mount the
hitch to the left rear dropout of your bike. Slide the hitch connector end on
the tongue between the hitch side arms, insert the retaining pin through the
holes and close the pin. Wrap the safety strap around the inside of the chain
stay twice and then over the hitch body. Fasten the hook to the D-ring on the
top of the tongue. (See your trailer manual for more instruction.)