


30
31
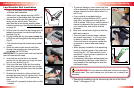
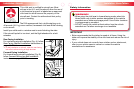
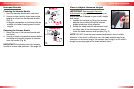
Storing the LATCH Connectors
When the LATCH connector is not in use, lift the
cover to access the LATCH storage slots (Fig. A).
Fold the LATCH adjuster and the connector, then
slide each set into the adjacent slot.
NOTE: Child seats are shipped from Britax with the
LATCH connectors in the storage slots.
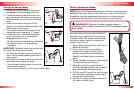
Recline Adjustment
Pull the recline handle (Fig. B) then slide
the child seat shell into the desired position.
Release the recline handle, then verify the child
seat has locked into position.
a
b
c
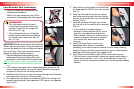
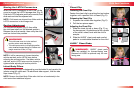
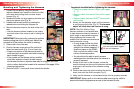
Chest Clip
Fastening the Chest Clip
Fasten the chest clip by pushing the two halves
together until a positive click is heard (Fig. D).
Releasing the Chest Clip
Squeeze the middle tabs together (Fig. E).1
Pull the two pieces apart.2
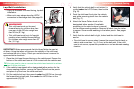
Adjusting the Chest Clip
Slide the chest clip up or down (Fig. F) on 1
the harness so it is positioned at the middle
of the child’s chest, level with the child’s
armpits.
Slide the HUGS2
™
chest pads and comfort
pads to a comfortable location for the child.
HUGS™ Chest Pads
NOTE: It will be necessary to loosen the tether,
vehicle seat belt, and/or LATCH strap before
adjusting the recline position. The tether, vehicle
seat belt, and/or LATCH strap must be properly re-
tightened after adjusting the recline position.
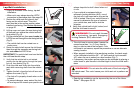
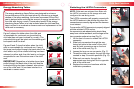
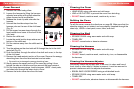
Infant Body Pillow
The Infant Body Pillow is designed to provide better fit and comfort for
infants using this child seat. For additional side support, fold the side
flaps inward (Fig. C).
NOTE: Remove the Infant Body Pillow after child can sit comfortably in the
child seat without additional support.
d
e
f
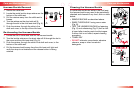
WARNING! HUGS
™
chest pads
must be installed for forward-facing use.
Removal of HUGS is optional only for rear-
facing use.
Child Seat FunctionsChild Seat Functions
WARNING!
This child seat must be in the reclined •
position when used rear-facing.
This child seat must be in full upright position •
when installed forward-facing for children who
weigh more than 33 lbs (15.1 kg).