


The hand brake is not a parking brake. (See section 8)
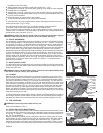
After installing the front wheel, the brake caliper will need to be placed in the
closed position. Close the brake quick release lever (Fig. 10) by squeezing the
brake pads against the wheel with one hand, then rotate the brake quick release
lever in the counter clockwise direction with your other hand until it points downward.
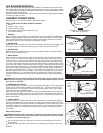
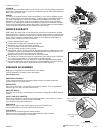
For the hand brake to work correctly, it is critical that it be adjusted properly.
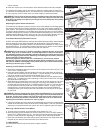
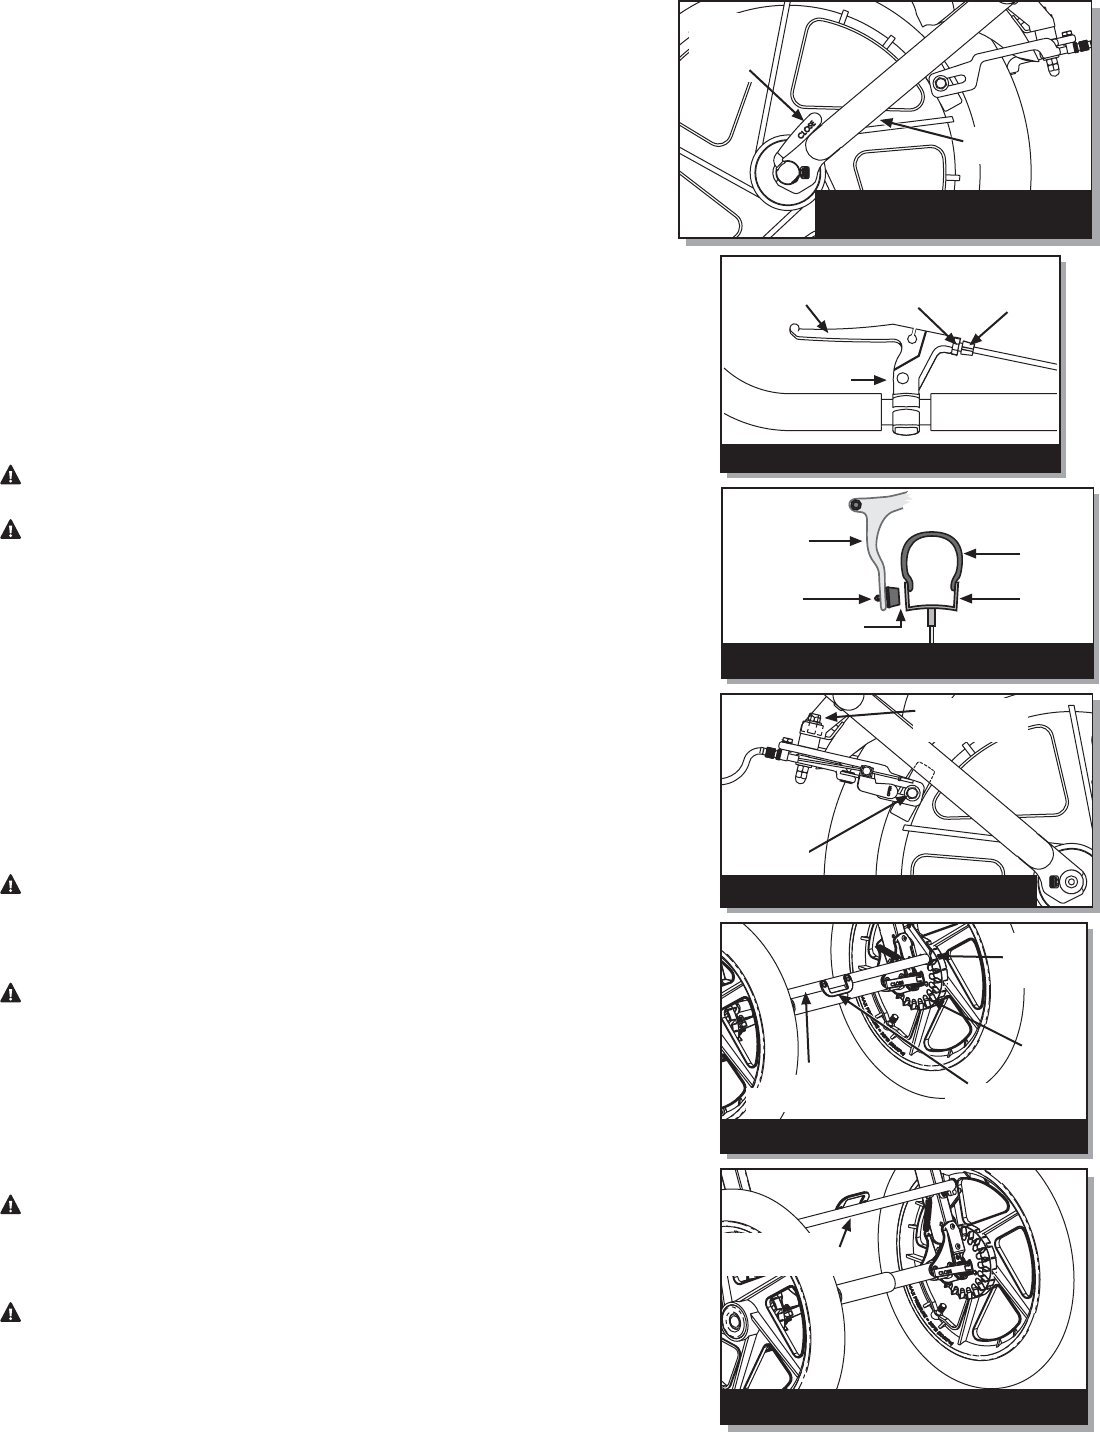
Squeeze the brake lever and verify that the brake pads contact the rim as shown
in Fig. 15. If they are misaligned, use a 10mm wrench to loosen brake pad nuts,
slide pads into correct position and tighten securely. The cable tension is pre-
adjusted at the factory yet the brake cable will need periodic adjustment (as the
cable stretches slightly and the black cable housing compresses over time). To
adjust cable tension, there are two barrel adjusters in the brake assembly (Fig.10
& 13). To tighten the cable, loosen the lock ring and turn the barrel adjuster in
the counter clockwise direction. Secure the barrel adjuster in the new position
by tightening the lock ring against the caliper or brake lever body. There should
be a 3/16(5mm) clearance between the rim and brake pads as shown in Fig. 14. If
gap is not equal on each brake pad, the brake caliper can easily be repositioned on the
frame by loosening the caliper mounting nut (Fig. 15) with a 10mm wrench, adjust to
the gap shown in Fig. 14 and re-tighten the same nut. If you do not understand these
instructions, or feel the brake is adjusted incorrectly, take the stroller to your dealer for
proper adjustment. If your brake pads (Fig. 10) are worn, see your dealer for replacements.
8. PARKING BRAKE:
The parking brake prevents the stroller from moving while loading and unloading.
The parking brake is not designed as a stopping brake.
WARNING: Do not use the parking brake to slow or stop the stroller because
doing so could cause the stroller to stop abruptly, resulting in loss of control.
WARNING: The parking brake is intended to park the stroller on flat surfaces, not
on inclines. Never leave your child in the stroller unattended with or without the
parking brake set!
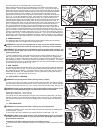
To set the parking brake, press the brake bar down into the locked position (Fig. 16)
with your foot on the red foot pedal making sure the locking pin fully engages the
locking disk. To ensure the brake is set properly, attempt to roll the stroller fore and aft
after setting the brake. If the stroller will not roll, the brake is set properly. To release
the parking brake, lift up on the red foot pedal with your foot until the brake bar springs
up into the fully unlocked position (Fig. 17).
9. SUN CANOPY:
The stroller features a two position canopy. To fully open the canopy, rotate the assembly
forward until the fabric is taut. The rear canopy flap should be freed from the Velcro to
give additional sun protection. To reduce the size of the sun canopy, pull the canopy
toward the handlebar. The additional fabric can be gathered by pulling the canopy
drawstring (Fig. 1) and securing the cord lock.
10. SEAT SAFETY HARNESS:
WARNING: Set parking brake before placing child in stroller.
To secure your child in the seat, put one shoulder strap over each shoulder and snap
the male buckle into the female receiver on the crotch strap (Fig. 18). Adjust shoulder
straps to be snug and secure (Fig. 19). Connect the sternum strap (red), see Fig. 20.
WARNING: Never place passengers in the stroller without securing them in the
harness. Unrestrained passengers can affect the control of the stroller.
Passenger weight limit - 70 lbs (32 kg)
Passenger height limit - 44 in (112 cm)
For heavier and or taller passengers (closer to the maximum limits above), auxiliary
harness anchors may be utilized by unfolding anchor Velcro (Fig. 19), sliding ladder
lock buckles above anchors, and reconnecting Velcro to keep ladder lock buckles in
place.
11. RECLINING SEAT:
WARNING: Set parking brake before making any seat adjustments.
To partially recline the seat, rotate the ladder lock buckles forward thus releasing the
reclining straps. (Fig 21)
To fully recline the seat, unfasten side release buckles at seat back. (Fig. 22)
WARNING: When seat is fully reclined, (Fig. 22) backward tip-over is more likely,
and may result in an accident or injury, as seat and/or passenger may contact
ground before handlebar.
Conditions that make backward tip-over more likely to occur:
.
Heavier and or taller passengers (closer to our maximum limits in this manual) make
Fig. 17 Parking Brake - Unlocked position
Brake Bar
(Unlocked Position)
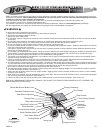
OMS01A P4
Fork
Blade
Quick
Release
Cam Lever
Closed
Fig. 12 Quick Release in the closed
position and parallel to fork blade
Fig. 13 Hand Brake Lever Anatomy
Brake lever
Lock Ring
Barrel Adjuster
Brake Lever
Body
Fig.15 Brake pads shown aligned to rim
Brake Pad
Nut
10mm Caliper
Mounting Nut
Fig. 14 Clearance between brake pad & rim
Tire
3/16 (5mm) Gap
Rim
Brake
Body
Brake
Pad
Locking
Disk
Brake Bar
(Locked Position)
Locking
Pin
(Engaged)
Red Foot Pedal
Fig. 16 Parking Brake - Locked position