


4
Tamping
When inlaying pavement markings in new asphalt
concrete surfaces, tamp the markings during the
final compaction (finishing roller) of the mat.
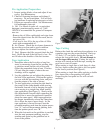
After application of markings on existing surfaces,
tamp the tape thoroughly with the 3M™ Roller
Tamper Cart (RTC-2) with a minimum 200 lb.
(90 kg) load, or slowly (2-3 mph) drive over the
tape three times with a vehicle tire. The vehicle
must be equipped with a pointing device to aid in
keeping the vehicle on the tape, making three
passes forward over the tape. Use a vehicle tire on
long line markings only. Do not attempt to tamp
intersection markings with a vehicle tire.
Tamping is most important!
When using the RTC-2 Roller Tamper Cart with
200 lbs. (90 kg.) of weight:
• Do not twist or turn the tamping device on the
tape.
• Make three passes back and forth over each part
of the tape.
• When tamping symbols, start in the center and
work to the outside edges.
• Make sure all edges are firmly adhered.
• Open road to traffic as soon as tamping is
complete.
Maintenance
Keep All Fasteners Tight
Lubrication:
All the pivot points and sliding areas
should be kept lubricated with light oil penetrant
such as 3M™ Five-Way Penetrant or similar pene-
trants such as WD-40.
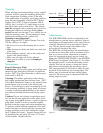
Cleaning: The rubber application roller wheels
and cutting mechanism must be kept clean. 3M™
Citrus Base Industrial Cleaner or any natural citrus
based cleaner may be used on the wheels and
knives. Solvents may be used occasionally for dif-
ficult cleaning problems. A spray bottle of cleaner
is useful to prevent asphalt buildup on the wheels
and adhesive buildup on the knives during opera-
tion.
Caution: Do not use solvents or petroleum prod-
ucts on the silicone application roller when work-
ing on new, hot asphalt surfaces. A paint scraper or
putty knife should be used to clean the asphalt
buildup from the scraper and cutter mounting bar.
To prevent asphalt buildup around the roller, addi-
tional clearance can be provided by loosening the
scraper mounting screws and sliding the scraper
back. Tighten the screws. Second, remove the cut-
ter mounting bar and grind 1/8 inch (3.175 mm)
off the bottom. Replace the bar.
Each Every 50 Every 100
Use Hour Hours
Engine Oil Check Level X X
Change*
Air Cleaner Check X X
Clean*
Spark Plug Clean and X
Readjust
*Service more frequently when used in dusty areas.
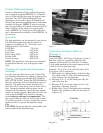
Adjustments
The SCRAPER BAR, which is readjusted by the
manufacturer to prevent excess materials from ac-
cumulating on the application roller, should be pe-
riodically checked for wear and rotated if neces-
sary. The bar should contact the rubber roller
across the full length of the roller.
The KNIVES are readjusted by the manufacturer
to slide across each other with a minimum of fric-
tion in a scissors action. Adjustment is needed
when foil construction tapes are not cleanly cut.
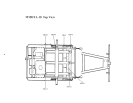
Either the STATIONARY KNIFE or the SLIDING
KNIFE may be adjusted (See Figure 5). To adjust
the stationary knife, loosen the mounting screws
slightly. Turn the set screws to bring the cutting
edge down, and retighten the mounting screws.
The same procedure is followed to adjust the slid-
ing knife. Each knife has two cutting edges. The
knives may be removed and new cutting edges
exposed. The knives may be sharpened after the
cutting edges are dull.
Figure 5