L4006,7,8; L6006,7,8 AQUASTAT
®
CONTROLLERS
9 60-2104—10
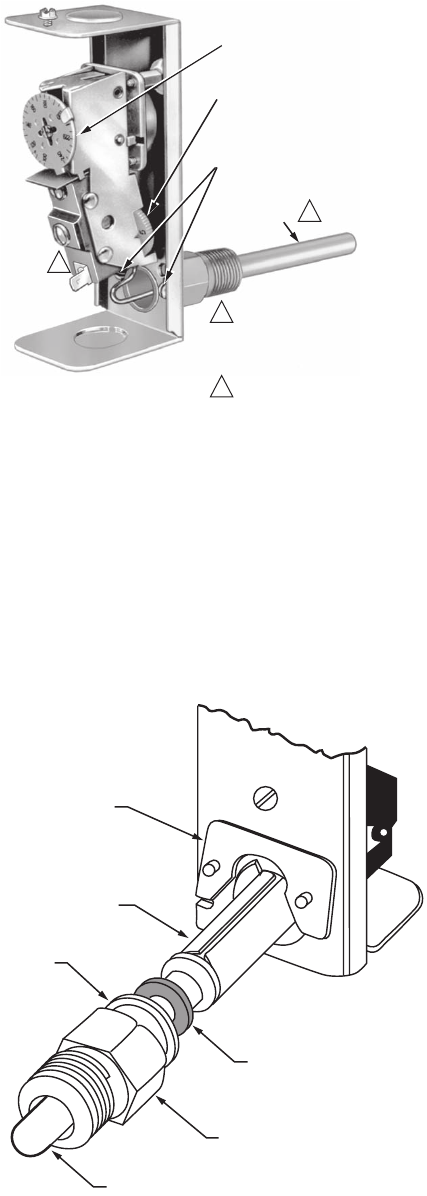
Fig. 6. Internal view of L6006A.
Installing Direct Immersion Models
(L4006C, L6006B)
Models that provide for direct immersion of the sensing
element into the boiler include a bulb compression fitting
assembly instead of an immersion well. Install the fitting in the
boiler tapping as follows:
1. Be sure the sealing washer is in place as shown in
Fig. 7. Make sure that the spud of the bulb compression
fitting is screwed in tightly enough to prevent leaking.
Fig. 7. Direct immersion model
with fitting partially removed.
2. Insert the immersion sensing bulb through the bulb
compression fitting. Adjust the adapter clamp so that the
clamp fits over the groove at the opening of the bulb
compression fitting.
3. Tighten the adapter clamp screws so that the Aquastat
Controller is firmly attached to the bulb compression
fitting.
Mounting Remote Bulb Models
(L4008A,B,E; L6008A,G,H)
The remote temperature-sensing bulb can either be installed in
an immersion well (See Fig. 8) that extends into the boiler or
tank, or it can be directly immersed in the controlled medium
(See Fig. 9). For installations that do not use a well, secure the
remote bulb with a bulb compression fitting (See Fig. 10), or
capillary compression fitting. (See Fig. 11).
Order well, well adapter, bulb compression fitting or capillary
compression fitting separately. See form no. 68-0040, Wells
and Fittings for Temperature Controllers. If used, well must
snugly fit sensing bulb for the best thermal response. Insert
bulb until it rests against the bottom of the well. Hold it there
while tightening the tubing clamp. (See Fig. 8).
The boiler manufacturer usually provides a tapping for the
insertion of the Aquastat Controller sensing element. This
tapping should be located at a point where typical water
temperature can be measured. Never locate the bulb or
protecting immersion well close to a hot or cold water inlet or a
steam coil.
If the system is filled, drain system to a point below the boiler
tapping, or wherever the sensing bulb is to be installed.
The bulb can also be installed in the supply line of an indirect
water heater, in the direct water heater itself, or in the feed
riser, about 6 in. (153 mm) above the boiler. If the riser is
valved, the bulb can be installed between the boiler and the
valve.
NOTE: Do not make sharp bends or kinks in the capillary.
Make bends no sharper than 1 in. (25 mm) radius.
After installing the controller, carefully coil the excess capillary
at the bottom of the controller case.
Mounting Immersion Well
1. Screw the well into the boiler, tank, or pipe tapping.
2. Insert the bulb in the well, pushing the tubing until the
bulb bottoms in the well.
3. Attach the retainer clamp to the end of the well spud.
Loosen the draw nut and spread the jaws of the clamp
with the screwdriver if necessary. (See Fig. 8).
4. With the retainer clamp attached to the well spud (be
sure the jaws of the clamp hook over the ridge at the end
of the spud, as shown at points A in Fig. 8), adjust the
tubing to fit through the retainer clamp groove, as shown
at point B in Fig. 8.
5. Tighten the draw nut so that the retainer clamp is firmly
attached to the well spud and the tubing is held securely
in place.
M8806A
SETPOINT
INDICATING DIAL
DIFFERENTIAL
ADJUSTMENT
WHEEL
ADAPTER CLAMP
SCREWS
INSERTION
ELEMENT
WITH VERTICAL MOUNTING OF
IMMERSION WELL, ELEMENT IS
ATTACHED TO BOTTOM OF THE
CASE.
SELECT MODELS HAVE SCREW
TERMINAL, NOT TAB TERMINAL.
1
2
2
1
M8774A
SENSING BULB
BULB COMPRESSION
FITTING
SEALING WASHER
DAPTER CLAMPS
FIT OVER
GROOVE
SPLIT SLEEVE
ADAPTER
CLAMP
