Page 13SKU 40315 For technical questions, please call 1-800-444-3353.
ing sure no hidden electric cords or
cables are in the drilling path.
6. Once the mounting holes are drilled,
align the four 7/16” wide x 3-1/2” long
mounting slots in the base of the
Inner Cover (16) with the four pre-
drilled mounting holes in the work-
bench. Secure the Tile Saw to the
workbench, using four appropriate
length Bolts, Lock Washers, and Nuts
(not included).
To Attach The Star Knob:
1. The Star Knob (53) is used to lock
the Cutting Guide (57) in position.
The Cutting Guide is used to set the
desired width of cut when cutting a
workpiece. (See Figure F.)
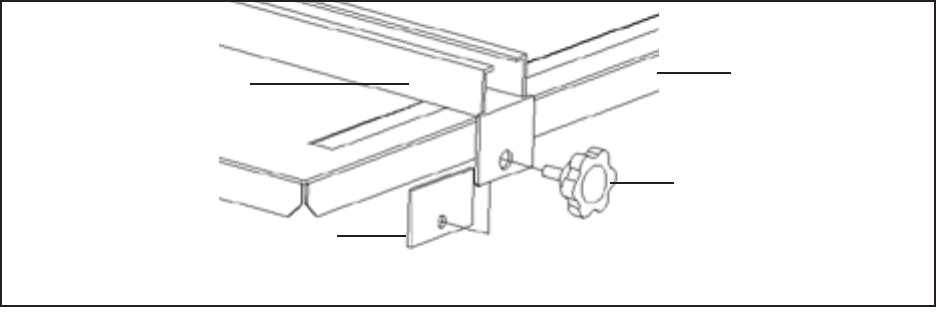
2. To attach the Star Knob (53), place
the Cutting Guide (57) on the Table
(51) of the Tile Saw. Place the
Clamping Plate (56) behind the edge
of the Table. Attach the Star Knob
to the Cutting Guide. (See Figure 2,
below.).
Install The Cutting Wheel Blade:
1. Make certain power is disonnected
and the power switch is in the “OFF”
position.
2. Empty the Tray (17). Turn it 90° (side-
ways) and remove it.
3. Remove the Screws (2) and Washers
(3). Remove the Front Cover (1), and
Rear Blade Cover (58).
4. Use the prongs on the Spanner
Wrench (59) to hold the Outside
Flange (7) while you use the Nut
Driver (60) to remove the Nut (4).
5. Install a new 7” diameter, 1” round
arbor hole, wet, diamond-bonded
Cutting Wheel Blade (SKU 67393)
rated at a minimum of 3565 RPM.
6. Replace the Outside Flange (7) and
Nut (4). Use the Spanner (59) to
hold the Outside Flange (7) while you
tighten the Nut (4) securely with the
Nut Driver (60).
STAR KNOB
(53)
CLAMPING PLATE
(56)
EDGE OF
TABLE
(51)
CUTTING GUIDE
(57)
FIGURE 2


