


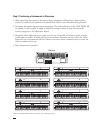


Step 1: Positioning of Instruments in Classroom
1. With input from the instructor, determine where instruments will be placed. Some teachers
want to see student hand positions in keyboard labs. Others want all students facing forward.
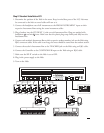
2. Determine the numbering system for instruments. The student buttons on the CONTROLLER
are labeled 1-8 left-to-right. It might be helpful to arrange students in that order from the
teacher’s perspective. (See illustration below)
3. Determine where cable and power cords are to be run. If possible, avoid places where students
would walk over cables. If cables will run across the floor, determine one spot where the cables
from each row of instruments will run. Obtain cord covers (from a hardware store) to cover the
cables so students don’t trip.
4. Place instruments in position.
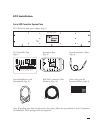
Pictured: one CP300 keyboard with LC3 controller, eight P155 digital pianos
2
16 24
32 40 48
9 17
25 33 41
10 18
26 34 42
11 19
27 35 43
12 20
28 36 44
13 21
29 37 45
14 22
30 38 46
15 23
31 39 47
Teacher
1
3
5
7
2
4
6
8