


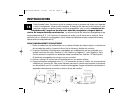

FOR AC POWER
1. IMPORTANT: make sure you only have rechargeable batteries or no batteries at
all in the battery compartment when using an AC adapter.
2. Insert the end of one adapter into the jack marked 9V DC that appears on the
side of the monitor and one into the jack marked 9V DC on the back of
the camera.
3. Plug the adapters into your electrical outlet.
HOWTOUSE
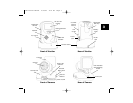
1. Turn both units on by pressing the Power ON/OFF button on the front of the camera
and by turning the ON/OFF dial on the side of the video monitor. The monitor’s
ON/OFF dial is also the volume control.
2. The power indicator on the front of both units will turn on and will be green.
3. Rotate the camera head so it faces your baby.
4. Adjust the monitor’s volume with the volume control knob.
5. Select the channel that gives you the best reception. The channel selector is located
on the side of the camera and on the front of the video receiver. Make sure both
units are tuned into the same channel.
6. For daytime vision, place the camera up to 10 feet from your baby making sure it is
out of reach. Adjust the antenna to achieve the best reception. You may also have to
adjust the distance of the camera from your baby.
7. For nighttime vision place the camera no more than 6 feet from your baby making
sure it is out of reach. Adjust the antenna to achieve the best reception. You may
also have to adjust the distance of the camera from your baby. Remember, when
using the infrared night vision the image will only be in black and white.
8. If the camera and video receiver are too close to each other you will hear static or
feedback. If this happens, increase the distance between the 2 units.
9. To mount the camera on the wall, use the mounting screws and anchors using the
template provided. Caution: Position the power cord out of the reach of children.
5
TV872-Final Manual 9/30/04 4:25 PM Page 5