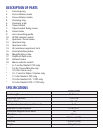
* Length and maximum diameter indicate the values for the lens with the Nikon mount.
* Specifications and design are subject to change without notice.
MOUNTING/REMOVING THE LENS
Mounting
After removing the rear cap, place the lens in the camera mount aligning the lens mount
index line with that of the camera body (Canon/Minolta/Pentax). For Nikon models, align
the lens mount index line with the dot on the camera. Rotate the lens clockwise until it
click-locks (counter-clockwise in case of Nikon body). (For details, please refer to the instruc-
tion manual of your camera.)
Removal
Push in and hold the lens release button on the camera body while rotating the lens count-
er-clockwise (clockwise in case of Nikon body.)
FOCUSING
Automatic Focusing (for Nikon/Minolta/Pentax AF SLR)
When the camera is on the autofocus mode, the lens focuses automatically. During AF (Auto
Focus) operation, the focusing ring will rotate and its movement should not be hindered.
Automatic Focusing (for Canon-EOS AF SLR)
Set the AF/MF Switch on the lens to "AF" mode. Pressing the shutter release button of the
camera will activate the auto-focusing function of the camera. During AF operation, the
focusing ring will rotate and its movement should not be hindered.
Manual Focusing
When the lens is used on a Nikon/Minolta/Pentax AF camera, switch the camera to the man-
ual focus mode. When the lens is on a Canon EOS camera, set the lens AF/MF Switch to the
"MF" mode. Turn the focusing ring while looking through the viewfinder.The correct focus
position is determined when the picture in the viewfinder becomes sharpest. In manual-
focus photography, focusing should always be checked through the viewfinder even when
shooting at infinity.
* For further details, see the instruction manual of your camera.
ZOOMING
To set your lens to the desired image composition you desire, simply look through the
viewfinder and operate the zoom ring.


