


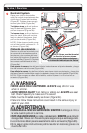
A
B
C
D
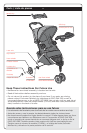
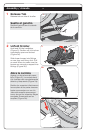
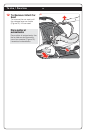
NOTE: Straps must be threaded
in direction of arrows shown.
NOTA: Las correas deben enhebrarse
en la dirección indicada por las flechas.
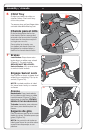
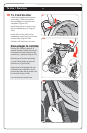
Top Loop
Lazo superior
Bottom Loop
Lazo inferior
To Use / Para Uso
8
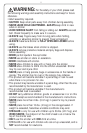
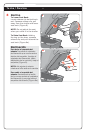
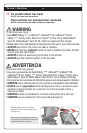
WARNING
• NEVER LEAVE CHILD UNATTENDED. ALWAYS keep child in view
when in stroller.
• AVOID SERIOUS INJURY from falling or sliding out. ALWAYS use seat
belt. Check frequently to make sure it is secure.
• Belts must be threaded exactly as shown (Figure 9b).
• Failure to follow these instructions could result in the serious injury or
death of your child.
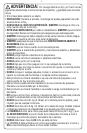
ADVERTENCIA
• NUNCA DEJE AL NIÑO SIN SUPERVISIÓN.
SIEMPRE mantenga al niño a
la vista cuando esté en la carriola.
• EVITE UNA LESIÓN GRAVE por caída o resbalamiento. SIEMPRE use el cinturón
de seguridad. Revise con frecuencia para asegurarse que esté asegurado.
• Los cinturones deben pasarse exactamente como se muestra (Figura 9b).
• El no seguir estas instrucciones podría resultar en lesiones graves o la
muerte del niño.
9
Restraint System
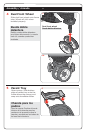
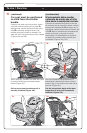
Place your child in the stroller,
with the crotch strap between the
child’s legs. Fasten both buckles
(Figure 9). Tighten straps snugly
around your child (Figure 9a).
To tighten strap, pull out bottom
loop to desired tightness, then
pull on strap end (Figure 9b).
To loosen strap, pull out bottom
loop for slack, then pull out top
loop to desired looseness, then
pull on the buckle (Figure 9b).
NOTE: If the straps should come
out of the buckle, rethread A - D
as shown (Figure 9b).
Cinturón de retención
Siente a su niño en la carriola, con
la correa de la entrepierna entre
las piernas y las correas del hom-
bro sobre los hombros. Enganche
ambas hebillas (Figura 9). Apriete
las correas ceñidamente al niño
(Figura 9a).
Para ajustar la correa, tire del lazo inferior hasta alcanzar el ajuste deseado y luego
tire del extremo de la correa (Figura 9b).
Para aflojar la correa, tire del lazo inferior para tener cierto movimiento, y luego tire
del lazo superior hasta aflojar según lo deseado; luego, tire de la hebilla (Figura 9b).
NOTA: Si las correas se salen de la hebilla, vuelva a pasar A a D tal como se
muestra (Figura 9b).
9b
9
9a