


9
En
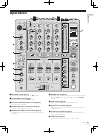
Operation
4 Turn the [MIXING] control.
This adjusts the monitor volume balance of the sound of channels for
which the [CUE] button is pressed and the sound of the [MASTER]
channel.
5 Turn the [LEVEL] control for [HEADPHONES].
The sound of the channels for which the [CUE] button is pressed is
output from the headphones.
! When the [CUE] button is pressed again, monitoring is canceled.
Switching the fader curve
Select the channel fader curve characteristics
Switch the [CH FADER (
, )] selector switch.
— [ ]: The curve rises suddenly at the back side.
— [ ]: The curve rises gradually (the sound gradually increases as
the channel fader is moved away from the front side).
Select the crossfader curve characteristics
Switch the [CROSS FADER (
, , )] selector switch.
— [ ]: Makes a sharply increasing curve (if the crossfader is
moved away from the [A] side, audio signals are immediately
output from the [B] side).
— [ ]: Makes a curve shaped between the two curves above and
below.
— [ ]: Makes a gradually increasing curve (if the crossfader is
moved away from the [A] side, the sound on the [B] side gradu-
ally increases, while the sound on the [A] gradually decreases).
Starting playback on a DJ player using
the fader (fader start)
If you connect a Pioneer DJ player using a control cable (supplied with
a DJ player), you can start playback of control other operations of the DJ
player with the fader of this unit.
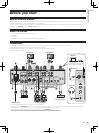
Connect this unit and Pioneer DJ player beforehand. For instructions on
connections, see Connections on page 5.
Start playback using the channel fader
1 Set the [CROSS FADER ASSIGN (A, THRU, B)] selector
switch to [THRU].
2 Press one of the [FADER START (CH-2, CH-3)] buttons.
Select the channel to be started with the fader start function.
3 Set the channel fader to the nearest position towards
you.
4 Set the cue on the DJ player.
The DJ player pauses playback at the cue point.
5 Move the channel fader away from you.
Playback starts on the DJ player.
! If you set the channel fader back to the original position, the player
instantaneously returns to the cue point already set and pauses
playback (back cue).
Start playback using the crossfader
1 Set the [CROSS FADER ASSIGN (A, THRU, B)] selector
switch to [A] or [B].
2 Press one of the [FADER START (CH-2, CH-3)] buttons.
Select the channel to be started with the fader start function.
3 Set the crossfader.
Set to the edge opposite the side on which the channel you want to use
with the fader start function is set.
4 Set the cue on the DJ player.
The DJ player pauses playback at the cue point.
5 Set the crossfader.
Playback starts on the DJ player.
! If you set the crossfader back to the original position, the player
instantaneously returns to the cue point already set and pauses
playback (back cue).
Using a microphone
1 Connect the microphone to the [MIC] jack.
2 Set the [OFF, ON, TALK OVER] selector switch to [ON]
or [TALK OVER].
— [ON]: The indicator lights.
— [TALK OVER]: The indicator flashes.
! When set to [TALK OVER], the sound of channels other than the
[MIC] channel is attenuated by 18 dB (default) when a sound of –10
dB or greater is input to the microphone.
! The audio attenuation level for the [TALK OVER] mode can be
changed at the [USER SETUP] screen. For instructions on changing
the level, see this product’s operating instructions.
! The talk over mode can be switched between the normal mode and
the advanced mode. For instructions on changing the mode, see this
product’s operating instructions.
3 Turn the [MIC LEVEL] control.
Adjust the level of the sound output from the [MIC] channel.
! Pay attention that rotating to the extreme right position outputs a
very loud sound.
4 Input audio signals to the microphone.
Adjusting the sound quality
Turn the [MIC] channels’ [EQ (HI, LOW)] controls.
The adjustable ranges for the respective controls are as shown below.
! HI: –12 dB to +12 dB (10 kHz)
! LOW: –12 dB to +12 dB (100 Hz)
Switching between monaural and stereo
audio
This switches the sound output from the [MASTER1], [MASTER2],
[BOOTH], [REC OUT], [PHONES], [DIGITAL MASTER OUT] and [USB]
terminals between monaural and stereo.
! To adjust the sound output from the [USB] terminals, select [REC
OUT] at [Mixer Audio Output] in the setting utility.
Switch the [MONO, STEREO] selector switch.
— [MONO]: Outputs monaural audio.
— [STEREO]: Outputs stereo audio.
Adjusting the L/R balance of audio
The left/right balance of the sound output from the [MASTER1],
[MASTER2], [BOOTH], [REC OUT], [PHONES], [DIGITAL MASTER OUT]
and [USB] terminals can be adjusted.
! To adjust the sound output from the [USB] terminals, select [REC
OUT] at [Mixer Audio Output] in the setting utility.
1 Set the [MONO, STEREO] selector switch to [STEREO].
2 Turn the [BALANCE] control.
The sound’s left/right balance changes according to the direction in
which the [BALANCE] control is turned and its position.
! Rotating to the rightmost position outputs only the right sound of
stereo audio. Rotating to the leftmost position outputs only the left
sound of stereo audio.
Audio is output from the [BOOTH]
terminal
Turn the [BOOTH MONITOR] control.
Adjusts the level of audio signals output from the [BOOTH] terminal.