


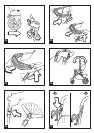
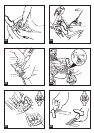


7• To mount the basket, press the side
buttons and pull to extract the basket rod.
8• Check that the basket bar is properly
aligned as indicated in the figure.
9• Slip the rod through the basket fabric.
Insert the rod with the basket into its
housing, and press until it clicks into
place.
10• Fasten the basket sideways to the buttons
and before insert the two eyelets in the
stroller as indicated in the figure.
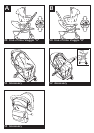
11• The stroller basket has three different
positions.
A: The normal position.
B: A lowered position, obtained by
pressing the basket down, to allow
you to use it even when the backrest is
completely lowered.
C: Basket raised to allow access to the rear
footrest.
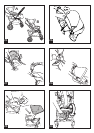
BRAKE
12• To use the brake on the stroller, pull the
lever towards you until it clicks, as shown
in the figure. When stationary, always
apply the brake.
13• To tighten the brake, turn the
REGULATOR on the handlebar outwards,
as shown in Figure A.
To release and loosen the brake, turn the
REGULATOR inwards, as shown in Figure
B.
SAFETY BELT
14• A: Make sure that the brace is properly
inserted by pushing as shown in the
figure. B: Fasten the belt as shown in the
figure.
15• To unfasten the belt, press on the buckle
sides and pull out the waist strap.
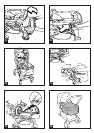
16• The new safety belt is now easier to
fasten thanks to the "snap-open-and-
shut" device. Before fastening the safety
belt, attach the buckle to the backrest
by inserting the tab through the special
holder, as shown in the figure. After
fastening the safety belt on your child,
detach it from the backrest to allow the
child more freedom of movement. The
buckle must remain below the child's
shoulders.
ADJUSTING THE BACKREST
17• The backrest reclines to three different
positions. To lower the backrest, lift the
handlebar and fix the backrest in the
desired position. To raise the backrest,
pull it upwards.
ADJUSTING THE FOOTREST
18• The footrest can be adjusted to two
positions. To lower it, pull the two levers
downwards while lowering the footrest, as
shown in the figure. To raise the footrest,
lift it upwards until it clicks into place.
SWIVELLING WHEELS
19• The stroller is equipped with two smaller
swivelling wheels. To allow the wheels to
swivel, raise the lever as indicated in the
figure. To lock swivelling, lower the lever.
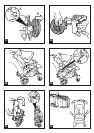
FRONT BAR
20• To insert the front bar-child tray, place
it near the housing and push it in until it
clicks.
21• The front bar can be moved forward a
notch. To do this, push the buttons under
the armrests and at the same time pull the
front bar out. It is dangerous to put hot
drinks on the tray.
HANDLEBAR
22• To reverse the handlebar, simultaneously
pull the little levers on the handlebar
upwards and move the handlebar to the
opposite position, pressing until you hear
the final click. While carrying out this
operation, be very careful not to catch
your child's hands or arms.
23• To adjust the handlebar height, press the
side buttons simultaneously, as shown in
the figure, and lock the handlebar into the
desired position.
DRINK-HOLDER
24• The drink holder can be placed on the left
or right hand side of the stroller, thanks
to the attachment which is already fitted
on both sides. To fit the drink holder,
click it on, as in Figure A. See Figure B
for a fitted drink holder. Do not place
anything heavier than 1 Kg. (2.2 lbs.) in
the drink-holder.
BABY CARRIAGE AND/OR STROLLER
25•
A) BABY CARRIAGE: Uno becomes a baby
carriage when the backrest is lowered to
the last position, with the footrest raised,
the handlebar positioned opposite the
backrest, and the wheels on the same side
as the backrest set to swivel.
• B) STROLLER: Uno becomes a stroller when
the backrest is raised, with the footrest
lowered, the handlebar positioned on the
same side as the backrest, and the wheels
opposite the backrest set to swivel.
HOOD
26• The hood is supplied with the front border
folded up. It should not be used like this
however. In order to be able to use the
hood correctly, turn the edge up, as in the
figure.
27• To attach the hood, insert the tabs
into the special notches on the stroller
armrests as shown in the figure, and
fasten the hood to the back of the
backrest.
28• Fasten the hood to the inner sides of the
armrests, stretch out the hood, and press
down on the side braces as shown in the