


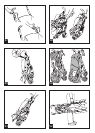


on the stroller version of Pramette (when
the zip is open the elastic loops ensure
that the rain canopy remains fastened to
the stroller).
43• This rain canopy is also designed for
use when the Primo Viaggio car seat is
hooked onto the stroller, ensuring total
protection.
44• The figure shows the rain canopy on the
carriage version of Pramette.
45• The figure shows where to fasten the rain
canopy button and elastic band on the
Pramette carriage version.
46• The figure shows the lowered rain canopy
on the carriage version of Pramette (when
the zip is open the elastic loops ensure
that the rain canopy remains fastened to
the stroller).
• Do not use the rain canopy indoors and
always check to be sure that your child is
not too hot.
• Do not place the PVC rain canopy near
sources of heat and pay attention to
cigarettes.
• Verify that the rain canopy cannot
interfere with any moving mechanism of
the chassis or stroller.
• Always remove the rain canopy before
closing your chassis or stroller.
• Wash with a sponge and soapy water
without using any detergent.
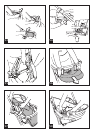
CLOSING
Before closing the stroller, loosen the
braces if the hood is attached, and raise
the backrest if it is lowered.
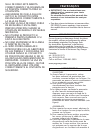
47• The stroller can be closed with one hand:
pull first one lever up and then the other
until it releases.
48• Grip the central handle and pull it upward
until it closes, as shown in the figure.
49• Verify the correct closing of the stroller
from the safety hook. The folded stroller
can stand upright.
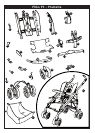
50• Pliko P3-Pramette can be closed while
the hood and cover are mounted, both in
the stroller and the baby carriage version.
When closed, the hood will be on the
top and the cover on the bottom for the
stroller version (A), and the cover will be
on the top and the hood on the bottom
for the baby carriage version (B).
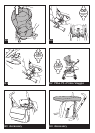
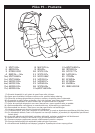
TRANSPORT
51• The stroller can easily be carried (lock the
swivelling front wheels) by gripping the
central handle, as shown in the figure.
52• You can also use the side handle to carry
it, as shown in the figure.
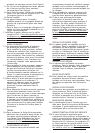
REMOVABLE LINING
53• To remove the strollerʼs lining, loosen the
fasteners on the armrests as shown by
the arrows.
54• Unbutton the sack at the side, as shown
in the figure. Slip the leg divider on the
safety belt out from under the seat.
55• Unscrew the strap (only on one side) as
shown in the figure, holding your finger
under the nut.
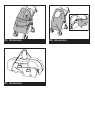
56• Unbutton the sack from the seat, and slip
it off the hooks on the footboard.
57• Slip the sack off the side of the backrest,
as shown in the figure.
58• Slip the previously loosened strap
through the slit in the sack, as shown in
the figure.
59• Remove the sack and wash it, following
the instructions given here.
• To remount the sack on the stroller, carry
out the instructions in the reverse order,
making sure to screw the strap back into
place.
GANCIOMATIC SYSTEM
The Ganciomatic System is the swift,
practical system that allows one to fasten
to the stroller, with Ganciomatic fasteners,
the car seat Primo Viaggio, which can be
bought separately and is also equipped with
Ganciomatic System. Primo Viaggio can be
detached from its base (which stays in the car)
and attached to the Ganciomatic fasteners of
the stroller to transport your child without
disturbing him/her.
STROLLER GANCIOMATIC HOOKS
60• To raise the Ganciomatic hooks on the
stroller, pull the sack up at the corners of
the seat and turn the two hooks upwards
until they click into place.
61• To lower the Ganciomatic hooks on the
stroller, pull the little lever outwards and
turn the hooks upwards at the same time,
as shown in the figure.
• Lower the Ganciomatic fasteners if,
afterwards, you use Pliko P3-Pramette in
the carriage version.
PLIKO P3 PRAMETTE + PRIMO VIAGGIO
• Fasten “Primo Viaggio” onto Pliko P3-
Pramette in the stroller version.
62• To fasten the car seat to the stroller:
- set the brake on the stroller;
- remove the hood from the stroller;
- completely lower the backrest on the
stroller;
- raise the Ganciomatic hooks on the
stroller;
- place the car seat, turned towards the
adult, on the stroller and push downward
until it clicks into place;
- Do not remove the front bar of the
stroller when attaching the car seat,
and make sure that it is in its original
position;
• See the userʼs manual for instructions
on how to detach the car seat from the
stroller.