


(carbon-zinc), or rechargeable
(nickel-cadmium) batteries.
CHARGING THE BATTERY
• Charge the batteries no longer
than 24 hours, following the
instructions enclosed with the
battery charger.
• Charge the battery, as the vehicle
shows low power, in this way you
will avoid damage to the battery.
• If you don’t use your vehicle for a
long period of time unplug the
battery from the main wire
harness of the vehicle. Remember
to charge the battery at least every
three months.
• Never charge the battery upside
down.
• Do not forget batteries during
charging! Check them periodically.
• Never use a replacement recharger
or batteries unless they are
approved by PEG PEREGO.
• Batteries are sealed and
maintenance free.
• Battery polarity must be observed
when connecting battery to
wiring.
WARNING:
• BATTERIES CONTAIN TOXIC AND
CORROSIVE SUBSTANCES. DO NOT
TAMPER WITH THEM.
• Batteries contain an acid-based
electrolyte.
• Do not make direct contact
between battery terminals, as this
can cause an explosion or fire.
• Charging produces explosive
gases. Charge batteries in a well
ventilated area away from sources
of heat and flammable materials.
• Exhausted batteries are to be
removed from the vehicle.
• Do not place the batteries near
clothing to avoid damage.
IF A LEAK DEVELOPS
Shield your eyes. Avoid direct
contact with the electrolyte, protect
your hands.
Place battery in a plastic bag and
follow directions listed below.
IF ELECTROLYTE COMES IN
CONTACT WITH SKIN OR CLOTHING
Flush with cool water for at least 15
minutes.
See a physician at once.
IF ELECTROLYTE IS INGESTED
Give tap water, milk of magnesia or
egg whites at once.
Do not induce vomiting.
See a physician at once.
DISPOSAL OF BATTERIES
Help protect the environment!
Do not throw used batteries in your
regular, household trash.
Dispose of the old batteries in an
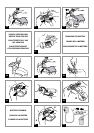
hollow part of the indicator is facing down.
10 • Press on the 2 headlights as shown in detail A.
11 • Position the steering wheel. Fix the steering
wheel with the screw and washer provided.
12 • Push on the steering wheel cap as shown in the
figure.
13 • Unscrew the hood.
14 • Pull the hood towards you while lifting and
turning it to remove (see figure).
15 • Connect the battery plug to the electric system
plug.
16 • Close the hood, taking care to correctly insert
the tabs into the openings in the chassis.
ATTENTION: Detail A shows the hood
incorrectly attached. The vehicle is ready for
use.
VEHICLE FEATURES AND INSTRUCTIONS FOR USE
17 • ACCELERATOR PEDAL/ELECTRIC BRAKE: when
the foot is lifted from the accelerator pedal, the
electric brake automatically stops the tractor.
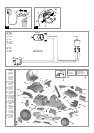
REPLACING THE BATTERY
18 • Unscrew the hood.
19 • Pull the hood towards you while lifting and
turning it to remove (see figure).
20 • Loosen the 2 screws that hold the battery in
place.
21 • Disconnect the 2 plugs and remove the battery
supplied with the vehicle.
22 • Insert a new 6V-8Ah battery and connect the
two plugs.
23 • Screw the battery clamp into place again,
turning it upside down as shown in the figure.
Close the hood as described above (fig. 18) and
fasten with the screw.
BATTERY RECHARGE
WARNING:
WARNING: BATTERY CHARGING
AND ANY OTHER OPERATION ON
THE ELECTRICAL SYSTEM MUST BE
CARRIED OUT BY ADULTS ONLY.
THE BATTERY CAN ALSO BE CHARGED
WITHOUT REMOVING IT FROM THE
VEHICLE.
24 • Unplug vehicle wiring terminal A from battery
terminal B, by pressing terminals on side and
pulling apart.
25 • Plug the battery charger terminal to a wall
outlet following the instructions enclosed.
Connect the plug B to the battery charger plug
C.
26 • Once the charge is completed unplug
recharger from wall outlet. Unplug recharger
cord terminal C from battery terminal B.
27 • Plug battery terminal A into vehicle wiring
terminal B. Close hood.
Before riding, charge your batteries
for 18 hours to initiate them. Failure
to do this will result in permanent
battery damage.
CAUTION:
Only adults should recharge
batteries,never
children.
Never allow children to handle
batteries.
Only use the batteries specified by
the manufacturer. Only use the
charger specified by the
manufacturer.
Do not mix old and new batteries.
Do not mix alkaline, standard
• PEG PEREGO® thanks you for choosing this
product. For over 50 years, PEG PEREGO has been
taking children for an outing: first with its famous
baby carriages and strollers, later with its pedal and
battery operated toy vehicles.
• Read this instruction manual carefully to learn the
use of the vehicle and to teach your child safe and
enjoyable driving. Please keep this manual for use
as a reference in the future.
• Our toys conform with the safety requirements
provided by the Council of the EEC, of the T.Ü.V.; of
the I.I.S.G. Istituto Italiano Sicurezza Giocattoli, and
the U.S. Consumer Toy Safety Specification F963.
Peg Perego S.p.A. is an ISO 9001
certified company.
The fact that we are certified provides
a guarantee of our honesty for our
customers, and fosters trust in the
company’s way of working.
• Peg Perego reserves the right to modify or change
its product. Price, literature, manufacturing
processes or locations or any combination of the
above mentioned entities may change at any time
for any reason without notice with impunity.
Years 2-4
Weight capacity
55 lbs
CAUTION:
ELECTRIC VEHICLE NOT
RECOMMENDED FOR CHILDREN
UNDER 2 YEARS OF AGE. AS WITH
ALL ELECTRIC PRODUCTS,
PRECAUTIONS SHOULD BE
OBSERVED DURING HANDLING
AND USE TO PREVENT ELECTRIC
SHOCK. RECHARGER INCLUDED.120
VOLTS, 60Hz, 15W INPUT, 6 VOLTS
(DC) OUTPUT.
PEG PEREGO offers after-sales services, directly or
through a network of authorized service centers for
repairs or replacement parts. See the back cover of
this instruction manual for contact information.
CAUTION:
ADULT ASSEMBLY REQUIRED.
USE CARE WHEN UNPACKING AS
COMPONENTS TO BE ASSEMBLED
MAY POSE A SMALL PARTS/SHARP
EDGE HAZARD.
BATTERY ALREADY INSTALLED IN
VEHICLE.
ASSEMBLY
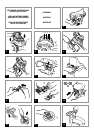
1 • Unscrew the 2 knobs under the seat.
2 • Position the seat as shown in the figure.
3 • IMPORTANT: the seat can be adjusted to 2
positions depending on the height of the child
(see figure). Position 1: the seat is higher and
further back. Position 2: the seat is lower and
further forward.
4 • Turn the vehicle on its side, keeping the seat in
position. Unscrew the frame under the vehicle.
5 • Open the cover to access the seat fixing screws.
6 • Screw on the two seat fixing knobs as shown in
the figure. Close and screw on the cover.
7 • Snap on the 2 rear lights.
8 • Assemble the indicators as shown in the figure.
9 • Fit the 2 indicators at the front of the vehicle, as
shown in figures 1-2, taking care that the
ENGLISH
CUSTOMER SERVICE
ASSEMBLY INSTRUCTIONS
BATTERY MAINTENANCE
AND SAFETY