


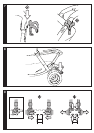
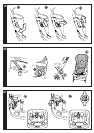


you hear the final click: the wheel is securely fastened.
3 FITTING THE FRONT WHEELS: To mount the front wheels, lower the lever (fig_a) and click
the wheels into place (fig_b).
4 FITTING THE FRONT BAR: Attach the front bar as shown in the figure.
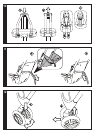
5 HOOD: To attach the hood, insert the tabs into the notches (fig_a) and button the hood to
the rear of the backrest (fig_b).
6 The hood can be moved to different positions while your child is sleeping (fig_a). To remove
the hood, press the side buttons while lifting the hood off (fig_b).
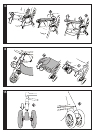
7 CUP HOLDER: The cup holder can be placed on the left or right hand side of the stroller,
thanks to the attachment which is already fitted on both sides. To fit the cup holder, click it
on (fig_a). Fitted cup holder (fig_b).
8 BRAKE: Press down on the brake lever situated on the rear wheel unit to set the brake on
the stroller. Lift the lever to release the brake. Always set the brake when the stroller is at a
standstill.
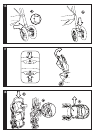
9 5-POINT SAFETY BELT: Attach by inserting the two buckles of the waist strap (with
shoulder straps attached) into the leg divider until they click into place (fig_a). To unfasten
the belt, press on the buckle sides and pull out the waist strap (fig_b).
10 In order to put on the safety belt, pass the strap adjustor through the slot in the backrest
(fig_a) and detach it after strapping the child in, thus allowing more freedom of movement
(fig_b). The strap adjustor must remain below the child’s shoulders so that the straps do not
slip (fig_c).
11 ADJUSTING THE BACKREST: To recline the backrest, lower the backrest adjuster button
while pushing the backrest down (fig_a). To raise the backrest, push the backrest adjuster
button upwards (fig_b).
12 SWIVELLING WHEELS: Lower the lever (fig_a) to allow the front wheels to swivel. Lift the
lever for fixed wheels (fig_b).
13 FRONT BAR-CHILD TRAY The front bar-child tray can be opened to make it easier for the
child to get in and out of the stroller when he or she is older. To open the front bar on one
side only press one of the two buttons (1 or 2) and lift it upwards. To remove the front bar-
child tray, press the two buttons as shown in the figure while pulling it upwards (fig_a). To
remove it press both buttons (1 and 2) while pulling it upwards (fig_b). Do not place boiling-
hot drinks on the front bar-child tray; this could be dangerous.
14 REPLACING THE BASKET: If it is necessary to replace the basket, fasten the front of the
new basket to the hooks (fig_a) and close the buttons on the back (fig_b).
15 REMOVING THE WHEELS: The wheels on the stroller are removable. To remove the front
wheels, set them to swivel, press the levers (fig_a) and at the same time push the wheel
until it comes off (fig_b).
16 To remove the rear wheels, press the button (fig_a) and at the same time push the wheels
down until they come off (fig_b).
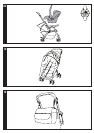
17 FOLDING UP THE STROLLER: If the hood is attached, close it before folding up the
stroller. To close the stroller, move the handle in the same way as you do when opening it:
press the button (1) on the handlebar and at the same time push the handle (2).
18 Push the backrest and the hood towards the stroller, while lowering the handlebar into its
housing (fig_a). Check to make sure that the stroller is fastened securely with the safety clip
(fig_b). The folded-up stroller will stand upright by itself and it is possible to carry it thanks to
the practical handle (fig_c).
19 REMOVABLE LINING: To remove the lining from the stroller, first of all remove the hood,
then remove the little cover on the side by pressing on it (fig_a). Push the pin upwards and
then outwards (fig_b). Slip the pin out of the hole in the sack. Repeat on the other side.
20 To detach the sack from the seat, remove the leg divider from under the seat (fig_a), and