


• IMPORTANT: read the instructions carefully
before use. Save the instructions for future
reference.
• PEG PEREGO reserves the right to make any
necessary changes or improvements to the
products shown at any time without notice.
CUSTOMER SERVICE
If parts of the model are accidentally lost or
damaged, use only original Peg Perego spare
parts. Contact the Peg Perego Customer
Service for all repair work, replacements,
information about products, and sale of
original spare parts and accessories, at the
following:
USA:
tel.: 800.671.1701
fax: 260.471.6332
Call us toll free: 1.800.671.1701
CANADA:
tel.: 905.839.3371
fax: 905.839.9542
Call us toll free: 1.800.661.5050
www.pegperego.com
INSTRUCTIONS FOR USE
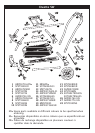
ASSEMBLING THE WHEELS
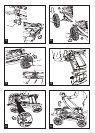
1• Remove the four protection caps (two
round ones and two square ones) from
the chassis while it is still folded up, as
shown in the Þ gure.
2• Mount the front wheels with the chassis
folded, pressing on the attachment lever
(Þ gure A) and inserting the hub onto the
rod (Þ gure B). Check to make sure the
wheels are correctly attached by pulling
them in opposite directions.
3• Repeat the same operation on the rear
wheels as for the front wheels (steps A
and B).
• Check to make sure the brake gear is
correctly installed.
BRAKE
4• To set the brake on the chassis, lower the
brake bar on the rear wheels, as shown in
the Þ gure.
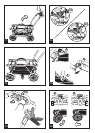
OPENING THE CHASSIS
• Set the brake while the chassis is still
folded up.
5• Unfasten the tab, as shown in the Þ gure.
6• Lift the handlebar in the direction shown
by the arrow.
7• Press the handlebar downwards until it
clicks into the Þ nal position.
8• To make sure the chassis is correctly
open, check the illustration.
BASKET
9• The basket goes at the base of the
chassis, as shown in the Þ gure.
10• The basket fastens to six diff erent points.
First, fasten it to the four buttons in the
front and back, as shown in Þ gure A
and B. Then fasten the two straps to the
chassis pipe, as shown in Þ gure C.
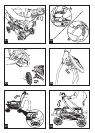
STEERING WHEEL
11• To allow a good grip, the steering wheel
can be adjusted to four diff erent positions
by pressing on the button shown in the
Þ gure.
SWIVEL WHEELS
12• The practical steering wheel has a lever
for swiveling the front wheels. Move the
lever on the steering wheel to the right
to swivel the front wheels, as shown in
Þ gure A. To set the wheels on stationary,
use the lever on the left, as shown in
Þ gure B.
OUTER HANDLES
13• The chassis can be completely lifted
off the ground using the center, outer
handles and the large back handle, as
shown in the Þ gure. It takes two people
to lift the chassis.
14• The Þ gure shows the correct way to lift
the chassis.
REMOVING THE WHEELS
15• To remove the wheels, press the lever
on the center of the wheel, as shown in
the Þ gure, and pull the wheel towards
yourself.
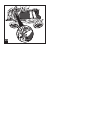
FOLDING UP THE CHASSIS
• Set the brake and unfasten the seats.
16• To fold up the chassis, lift the lever on
the large handle as shown in the Þ gure,
unfastening the handlebar and moving it
slightly forward.
17• Use your left foot to press the safety lever
downward to loosen the handlebar, as
shown in the Þ gure.
18• Turn the handlebar downward, as shown
in the Þ gure.
19• Fold up the chassis, fastening the tab to
the hook on the handlebar.
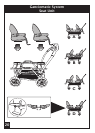
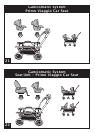
GANCIOMATIC SYSTEM
The Duette SW chassis features the G-matic
system and this means that you can select
the product to mount as required, from
the carriage to the car seat and carrying
chair. Follow the indications for the product
combinations listed below.
EN•ENGLISH