


PEG-PÉREGO AFTER-SALES SERVICE
If any parts of your Peg Pérego product should be accidentally mislaid or damaged, use
exclusively genuine original Peg Pérego replacements. For any repairs, replacements,
product information, and orders for genuine original replacement parts and accessories,
contact Peg Pérego After-Sales Service:
tel. 0039/039/60.88.213 fax 0039/039/33.09.992
e-mail assistenza@pegperego.it website www.pegperego.com
CLEANING AND MAINTENANCE
PRODUCT MAINTENANCE: protect from the weather: water, rain, or snow; prolonged and
continuous exposure to bright sunlight may give rise to colour changes of various different
materials; store this product in a dry place.
CLEANING THE CHASSIS: periodically clean all plastic parts with a damp cloth. Do not use
solvent or similar cleaning products; keep all metal parts dry to prevent rusting; keep moving
parts clean (adjustment mechanisms, locking mechanisms, wheels, ...) and free of dust and
sand and, if necessary, lubricate with light machine oil.
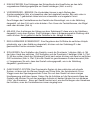
INSTRUCTIONS
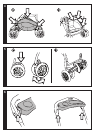
1 FITTING THE HANDLEBAR: before attaching the handlebar to the chassis, remove the two
protection caps as shown in the figure, otherwise it is not possible to attach the handlebar
(fig_a). With the help of a screwdriver, extract the screw from the handlebar and position it
on the chassis as shown in the figure (fig_b). Finally, tighten the screw into the bolt with the
screwdriver (fig_c).
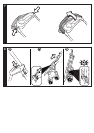
2 OPENING: before opening the chassis remove the two hook protection caps as shown in
the figure, otherwise the chassis will not open correctly (fig_a). To open the chassis, press
button number 1 with your right hand (fig_b). With your left hand grip the handle as shown in
the figure and press button 2 (fig_c). With your right hand raise the handlebar upwards until
it clicks into position. Check that the chassis is correctly open, as shown in the figure (fig_c).
3 FITTING THE WHEELS: insert the rear wheel unit until it clicks into position (fig_a). To
insert the front wheels, lower the lever and insert the wheel, as shown in the figure, until it
clicks into position (fig_b).
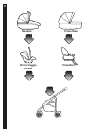
4 BASKET: to attach the basket, fasten the eyelets to the chassis as shown in the figure.
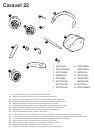
5 SWIVELLING WHEELS - BRAKE: to allow the front wheels to swivel, lower the lever as
shown in picture 1. To fix them, move the lever the opposite way, as in picture 2 (fig_a).
To apply the chassis brake, use a foot to lower the bar on the rear wheels, as shown in the
figure. To release the brake, raise the bar (fig_b).
6 TRAY: to release the tray from the handlebar, push it upwards as shown in the figure. To
attach it, push it downwards. It is dangerous to place boiling hot liquids on the tray.
7 ADJUSTABLE HANDLEBAR: to adjust the height of the handlebar, press both the side
buttons at the same time, as shown in the figure, and lock the handlebar in the desired
position.