


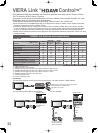


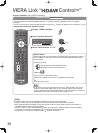
VIERA Link “HDAVI Control
TM
”
33
Advanced
Note
This function may not work properly depending on the connected equipment.
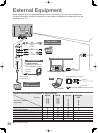
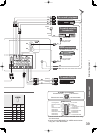
For DIGA Recorder / DVD Player / Blu-ray Disc Player / HD Video Camera / LUMIX Camera with VIERA
function, connect to HDMI1, HDMI2 or HDMI3 terminal via an HDMI cable.
For Player theatre / Blu-ray Disc theatre / Amplifier, connect to HDMI1, HDMI2 or HDMI3 terminal via an HDMI
cable and/or RCA cable for audio output from the TV.
Use fully wired HDMI compliant cable. Non-HDMI-compliant cables cannot be utilized.
Recommended Panasonic’s HDMI cable part number:
• RP-CDHG10 (1.0 m) • RP-CDHG15 (1.5 m) • RP-CDHG20 (2.0 m) • RP-CDHG30 (3.0 m) • RP-CDHG50 (5.0 m)
●
●
●
●
Preparations
Connect the equipment supporting VIERA Link.
Set up the connected equipment. Read the manual of the equipment.
For optimal recording, the settings of the recorder might be required. For details, read the manual of the
recorder.
Set VIERA Link On in Setup Menu “VIERA Link” (p. 21)
Set up the TV After connection, turn the equipment on and then switch the TV on. Select the input
mode to HDMI1, HDMI2 or HDMI3 (p. 16), and make sure that an image is displayed correctly.
This setup should be done each time when the following conditions occur:
• for the first time / • when adding or reconnecting equipment / • when changing setup
●
●
●
●
●
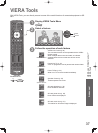
Features available
Channel download
Channel setting can be downloaded to the recorder.
Easy playback
Automatic input switching - When the connected equipment is operated, input mode is switched
automatically.
Power on link
Set Power on Link “On” in Setup Menu to use this function “Power on Link” (p. 21)
When the connected equipment starts playback or direct navigator / function menu for the equipment
are activated, the TV is automatically turned on. (Only when the TV is in Standby mode.)
Power off link
Set Power off Link “On” in Setup Menu to use this function “Power off Link” (p. 21)
When the TV is set to Standby mode, the connected equipment is also automatically set to Standby.
This function will work even if the TV enters standby mode automatically by Off Timer function or auto power
standby function.
●
Reduce unnecessary power consumption in standby
Standby Power Save
Set Standby Power Save “On” in the Setup Menu to use this function “Standby Power Save” (p. 21)
The power consumption in Standby mode of the connected equipment is controlled higher or lower in
synchronization with the TV On / Off state to reduce the consumption.
When the TV is set to Standby mode, the connected equipment is automatically set to Standby and
the power consumption in Standby mode of the connected equipment is automatically minimized.
When the TV is turned on, the connected equipment is still in Standby mode, but the power
consumption is increased to make startup time early.
This function is effective if the connected equipment can change the power consumption in Standby mode
and is set to higher consumption.
●
Auto standby for unnecessary equipment
Intelligent Auto Standby
Set Intelligent Auto Standby “On (With reminder)” or “On (No reminder)” in the Setup Menu to
use this function
“Intelligent Auto Standby” (p. 21)
When the TV is on, the connected equipments not in use go into Standby mode automatically to
reduce the power consumption.
If you select “On (With reminder)”, the on screen message will be displayed to be noticed before working this
function.
●