


6
Setup
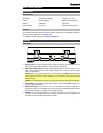
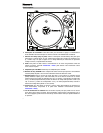
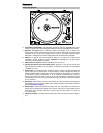
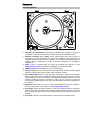
Platter
Place the platter onto the motor by aligning the pins in the bottom of
the platter with the holes in the motor. Press it down firmly. Check to
make sure that it rotates uniformly and does not wobble excessively,
and then place the slipmat onto the platter.
Important:
• Incorrect platter setup can lead to poor turntable performance,
platter instability or permanent motor damage.
• Make sure that the felt slipmat is always placed on top of the
platter while using the turntable. Failure to use the slipmat may
cause damage to your media as well as damage to the turntable.
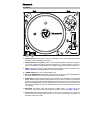
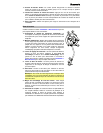
Tonearm
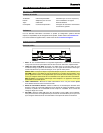
0 360° 1
2345
Important: Refer to the documentation for your cartridge to determine the proper stylus
pressure/weight (in grams) and tonearm height (in millimeters).
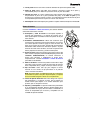
1. Make sure the cartridge is on the tonearm. Turn it clockwise to loosen it or
counterclockwise to tighten it. Do not over-tighten it! Remove the plastic cartridge cover
(needle cover) before operating the turntable.
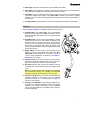
2. Rotate the counterweight counterclockwise (while you are facing the scale ring) until it is
in the complete forward position.
Note: This is also the maximum amount of pressure that can be applied to the cartridge.
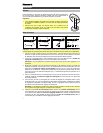
3. Now there should be a feeling of weight and resistance when the headshell is raised and
lowered. Begin rotating the counterweight clockwise (while you are facing the scale ring)
until the weight and resistance feeling is gone. If done properly, the tonearm will pivot with
very little resistance back and forth indicating that there is exactly 0 grams of stylus pressure.
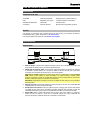
4. With the counterweight in its new position further away from tonearm pivot point, grasp
the scale ring only and rotate it until 0 is in the vertical position.
5. Finally, rotate the counterweight (and scale ring) counterclockwise until you reach the
desired weight. A complete revolution of the scale ring corresponds to 3 g, so if the scale
rotates 360° beyond the 0 point, add 3 to the new scale ring reading.
Note: The included headshell and cartridge assembly requires a minimum of 3 grams and
no more than 5 grams for optimum performance.
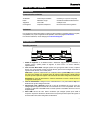
6. Push the small Lock lever (above the Anti-Skate Dial) counterclockwise to unlock the
height adjustment. Place the stylus on your record, and then move the Height Adjust lever
to raise or lower the tonearm so it is parallel with the record. Push the Lock lever
clockwise to lock the new height adjustment.
4 g