


To Operate the Auto-Dimming Feature:
Push the “ ” switch to turn the mirror on/off. The auto-dimming feature is enabled
when the green LED indicator is on.
To Operate the Compass Feature:
1. Push the display “ ” switch. The vehicle’s directional heading will be displayed.
2. Pushing the “ ” switch a second time will turn off the visual display.
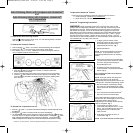
3. If the display reads “C” or “CAL”, calibrate the compass by driving the vehicle in
up to 3 complete circles at less than 5 MPH.
Auto-Dimming Mirror with Compass and HomeLink
®
and
Auto-Dimming Mirror with Compass, HomeLink
®
and Temperature
HomeLink
®
and the HomeLink
®
house are registered trademarks of Johnson Controls, Inc.
4. To adjust for compass variance:
a. Press the “ ” button for more than 9 seconds, or until the current zone
number appears in the display.
b. Find your current location and variance zone number on the zone map below.
c. Press the “ ” button until the new zone number appears in the display. After
you stop pressing the button, the display will show a compass heading within
a few seconds.
To Operate the Temperature Feature:
1. Push the “ ” switch. The vehicle’s directional heading and outside temperature will
be displayed.
2. Pushing the “ ” switch a second time will turn off the visual display.
3. The temperature display can be changed to Celsius by depressing the “ ” switch for
3 seconds, until a “°C” appears by itself in the display window. Pushing the “ ” switch
again will toggle the display between Celsius and Fahrenheit. Five seconds of no
switch activity returns the display to its normal directional and temperature reading.
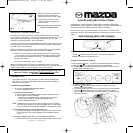
SENSOR
LED
AUTO-DIMMING
ON/OFF BUTTON
DISPLAY WINDOW
(Larger window for
Temp. model)
HOMELINK
BUTTONS
DISPLAY
BUTTON
CALIBRATION PROCEDURE
Fig. 1
Fig. 2
To Operate the HomeLink
®
Feature:
Please refer to the programming instructions outlined in this User Guide or:
a. visit the HomeLink
®
website at www.homelink.com
b. call the HomeLink
®
customer support line at 1-800-355-3515
HomeLink
®
Programming Instructions:
WARNING!
Before programming HomeLink
®
to a garage door opener or gate
operator, make sure that people and objects are out of the way of the device to prevent
potential harm or damage. When programming a garage door opener, it is advised to
park outside of the garage. Do not use HomeLink
®
with any garage door opener that
lacks safety stop and reverse features as required by U.S. federal safety standards (this
includes any garage door opener model manufactured before April 1, 1982). A garage
door that cannot detect an object – signaling the door to stop and reverse – does not
meet current U.S. federal safety standards. For more information, contact HomeLink
®
at
www.homelink.com
or by calling 1-800-355-3515.
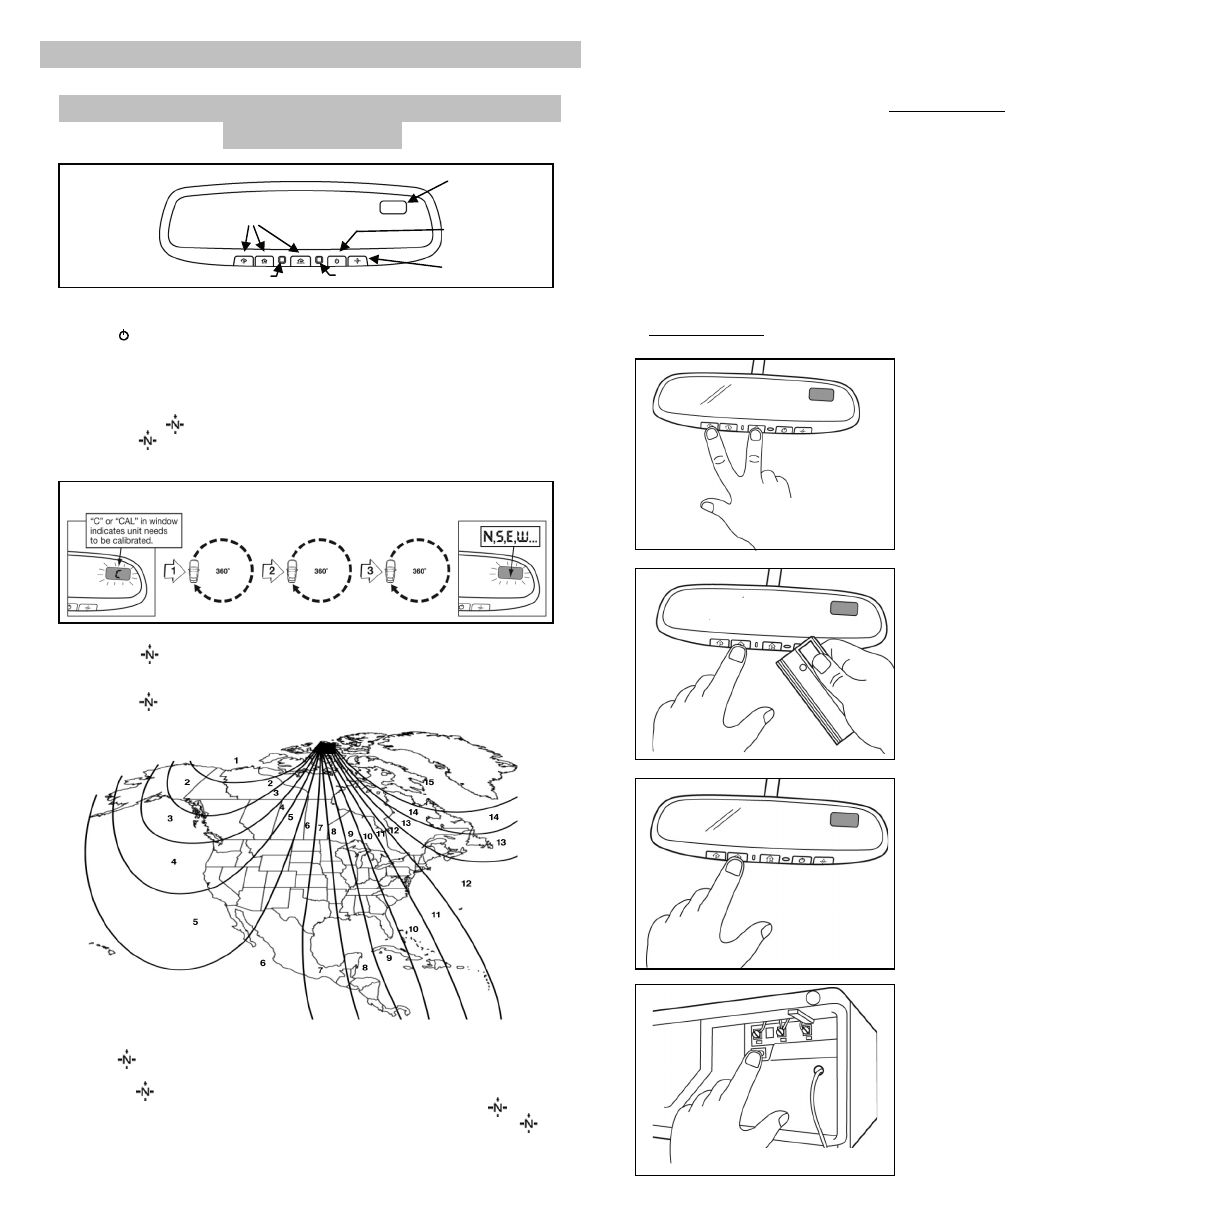
1. To begin, press and hold the 2 outer
HomeLink
®
buttons (to clear memory) until
the indicator light (LED) blinks slowly
(approximately 20 seconds). Fig. 1
2. Release both buttons.
NOTE: Do not hold the buttons for longer than
30 seconds. Do not repeat this step when
programming additional devices to remaining
buttons.
3. Position the end of the hand-held transmitter
1-3 inches away from the HomeLink
®
button
you wish to program while keeping the
the indicator light in view.
4. Simultaneously press and hold both the
chosen HomeLink
®
and hand-held transmitter
buttons. Fig. 2
Do not release the buttons until step 5 has
been completed.
NOTE: Some gate operator and garage door
openers may require you to replace this
Programming step 4 with procedures noted in the
“Gate Operator / Canadian Programming” section.
5. After the HomeLink
®
indicator light changes
from a slow to a rapidly blinking light, release
both the HomeLink
®
and hand-held transmitter
buttons.
6. Press and hold the just-trained HomeLink
®
button and observe the indicator light.
If the indicator light blinks rapidly for 2 seconds
and then turns to a constant light, the device being
programmed utilizes rolling code and
programming is not complete until the following
steps are completed. Fig. 3
7. On the garage door opener receiver
(motor-head unit) locate the “learn” or “smart”
button. This can usually be found where the
hanging antenna wire is attached to the
motor-head unit.
8. Firmly press and release the “learn” or
“smart” button. Fig. 4
NOTE: You have 30 seconds to initiate step 9.
Press and Hold for 20 seconds…
LED blinks slowly…
Release buttons
Press button…
Fast blink for 2
seconds then constant
= rollingcode…
Continue programming
instructions
Fig. 4
Fig. 3
Press andholdboth…
LED blinks fast…
Release both buttons
Press “Learn” button…
30 SECONDS TO GETTO VEHICLE
To Operate the Auto-Dimming Feature:
P
u
s
h
th
e “ ” switch to turn the mirror on/off. The auto-dimming feature is enabled
when the green LED indicator is on.
To Operate the Compass Feature:
1. Push the display “ ” switch. The vehicle’s directional heading will be displayed.
2. Pushing the “ ” switch a second time will turn off the visual display.
3. If the display reads “C” or “CAL”, calibrate the compass by driving the vehicle in
up to 3 complete circles at less than 5 MPH.
SENSOR
LED
AUTO-DIMMING
ON/OFF BUTTON
DISPLAY WINDOW
(Larger window for
Temp. model)
HOMELINK
BUTTONS
DISPLAY
BUTTON
CALIBRATION PROCEDURE
MazdaGuide550_0351A.hls 8/10/05 3:23 PM Page 3