


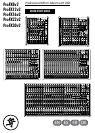


Quick Start Guide
9
Quick Start Guide
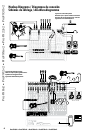
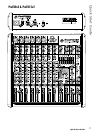
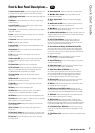
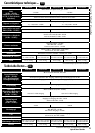
Front & Rear Panel Descriptions –
1. Power Connector & Switch Connect the supplied AC power cord
to this IEC jack. The power switch turns the mixer on and off.
2. 48V Phantom Power Switch Provides 48V, affecting all XLR jacks
simultaneously.
3. XLR Inputs Connect a balanced mic or line-level signal using
an XLR connector.
4. Line/Hi-Z Switch Engage the switch to play a guitar through
channel 1 without using a DI Box.
5. Line Inputs Connect a balanced or unbalanced line-level signal
using a 1/4" connector.
6. Insert Connect a serial effects processor, such as a compressor
or gate, using a 1/4" Y cable.
7. Compressor Reduces the dynamic range of input signals.
8. Gain Adjusts the input sensitivity.
9. Low Cut Switch Cuts bass frequencies below 100 Hz at a slope
of 18 dB per octave.
10. Equalization Boost or cut the level at certain frequencies
to enhance the sound.
11. Pan Adjusts how much of the signal is sent to the left
and right outputs.
12. Mute and OL LED Mutes the channel signal. The OL LED
illuminates when a signal is too high or if the mute switch
is engaged.
13. Channel Fader Adjusts the level to the main mix.
14. PFL Solo Switch Allows you to listen to individual channels
singly or in combination with other soloed signals. The rude
solo LED flashes when solo switches are engaged.
15. Assign Switches Determines the destination bus(es)
of the signal.
16. Main Out L/R Connect to the inputs of amplifiers, powered
speakers, or a serial effects processor.
17. Main Mix Adjusts the level of the signal sent to the main
and tape outputs.
18. Phones Connect stereo headphones here.
19. CR Out L/R Feed the inputs of a control room amplifier,
studio monitors or a headphone distribution amplifier.
20. CR/Phones Controls the control room and headphones levels.
21. Sub Out 1-4 Feed the inputs of a multitrack deck or secondary
power amplifiers in a complex installation.
22. Sub Assign Switches Assign each subgroup to the main left
and/or right buses.
23. Sub 1-4 Faders Control the levels of the signals sent to
the sub outs.
24. Tape Inputs / Outputs RCA inputs allow you to connect a line-
level source. RCA outputs allow you to record the main stereo mix.
25. Tape Level Controls the input level of a source connected
to the tape inputs.
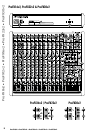
EN ES FR DE
26. Stereo Graphic EQ Adjusts the main mix / monitors output.
27. Main Mix / Mon 1 Switch Choose if the GEQ is used for
the main mix or monitors.
28. EQ In / Bypass Switch Allows you to quickly (dis)engage
the GEQ.
29. Break Switch and LED Mutes all channel inputs, but allows
tape or USB inputs to pass out of the main outs.
30. Main Meters Used to gauge the soloed input or output levels
to ensure that the signals are not clipping.
31. Aux Mon, Mon Send & Master Feed stage monitors via the mon
send jacks. Each channel has its own level control and the master
adjusts the overall output level.
32. Aux FX, FX Send & Master Feeds the internal FX or an
external processor via the FX send jack. Each channel has
its own level control and the FX master adjusts the overall level
sent out to the internal FX and FX outputs.
33. Preset Selector and Display, Int FX Mute Switch and LED
Turn the preset selector to choose an effect. The display shows
the number of the currently selected effects preset. Engage the
int FX mute to mute the internal effects processor and illuminate
the adjacent mute LED.
34. FX Footswitch Connect a footswitch to mute or un-mute
the internal effects. [ProFX16v2 & ProFX22v2]
35. Internal FX Routing Route the effects output to the monitors
and mains independently.
36. St/Aux Return Inputs Connect the stereo processed outputs
of an effects processor to these 1/4" TRS jacks.
37. St/Aux Return Master, OL LED, Mute Sets the overall
level of line signals received from the st/aux return L/R jacks.
The accompanying LED illuminates if the signal coming into
the stereo return inputs is too high. Engage the mute switch
to mute the signals coming into the stereo return inputs.
38. FX Return Fader Adjusts the level of the stereo output from
the internal FX processor being added to the main mix.
39. USB I/O A 2x2 interface allowing you to stream stereo audio
to and from the mixer via computer.
40. USB Input Level and USB Thru Switch Adjusts the level
of the stereo audio coming from the computer. USB Thru allows
you to send all mix inputs and USB playback back into the DAW.
41. USB Switch Routes stereo playback via the USB connection
into the channel (instead of the line inputs).
42. USB Out Switch Disengaging the switch allows the main
L/R mix to be recorded for convenient stereo mixes of the show.
Engaging the switch routes subgroups 1-2 over the USB connection
to your favorite DAW software for an alternate 2-track recording.
43. 2-Track Return Tape / USB Switch Determines if the 2-track
return gets its signal from the RCA inputs (disengaged) or USB
(engaged).
44. 2-Track Return Level Controls the overall level to the RCA inputs
or USB.