


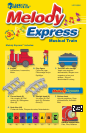


2
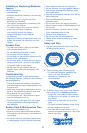
Installing or Replacing Batteries
Requires:
Phillips screwdriver
4 AAA batteries
• Batteries should be installed or replaced by
an adult.
• Melody Express™ requires four AAA
batteries (not included).
• The battery compartment is located on the
front of the train engine.
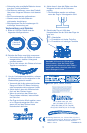
• To install batteries, first undo the access
screw with a Phillips screwdriver
and carefully remove the battery-
compartment door. Install batteries
as indicated.
• Replace the battery-compartment door and
tighten the screws. Be careful to not over-
tighten.
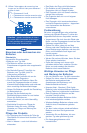
Product Care
• To clean this product, wipe part surfaces
with a barely damp cloth.
• Do not submerge any parts in water.
• Do not drop the train engine.
• Do not push on the switches located on the
bottom of the train engine.
• Do not stop, start, or move the train engine
using manual force. Allow the train engine
to operate under its own power.
• Do not take the train engine apart or
attempt repair other than changing of the
batteries.
Troubleshooting
If experiencing erratic or poor performance
with Melody Express
™
, please try the following
recommendations:
• Check to ensure the wheels of the engine
and train care are aligned appropriately with
the track rails.
• Make sure there are no obstructions on the
track or tile surfaces and that all track and
tile pieces lie flat and fit snugly.
• Turn the engine off. Wait several minutes
and turn the power back on.
• If performance is still poor, turn the engine
off and replace the current batteries with
new batteries.
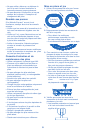
Battery Care & Maintenance Tips
• Use four AAA batteries only.
• Be sure an adult inserts batteries correctly
following the toy and battery manufacturer’s
instructions.
• Do not mix alkaline, standard (carbon-zinc),
or rechargeable (nickel-cadmium) batteries.
• Insert batteries with the correct polarity.
• Do not recharge non-rechargeable batteries.
• Only charge rechargeable batteries under
adult supervision.
• Remove rechargeable batteries from the toy
before charging.
• Only use batteries of the same or
equivalent type.
• Do not short-circuit the supply terminals.
• Always remove weak or dead batteries from
the product.
• Remove batteries if product will be stored
for an extended period of time.
• Store at room temperature.
• Do not mix new and used batteries.
• Please retain these instructions for future
reference.
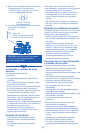
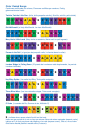
Setup and Play
1. Use the track pieces to create one of the
following configurations:
2. Carefully snap track pieces together.
• For best performance, assemble the
track on a hard, flat surface.
• Assembly on carpeting is not
recommended.
3. To build a song, snap music-note tiles into
the track slots in a clockwise direction.
• Follow the color-coded songs provided
on the back of this guide, or create your
own songs.
• Make sure all note tiles lay flat in the
track.
• To create a pause between notes, leave
an open space on the track.
• The train will not play music if run in a
counter-clockwise direction or if the track
has no note tiles.
2 straight &
8 curved
8 curved
clockwise
clockwise