


Assembly Instructions
USA
3
Please bear in mind that there is always a danger of children injuring themselves while using swings,
climbing frames, toy vehicles or similar equipment.
When riding the toy, the child should always wear covered footwear (no open toe shoes or barefoot riding).
When children are at play, situations may arise which cannot be predicted by the manufacturer and
for which he cannot be held responsible.
Never use corrosive or abrasive substances to clean the toy. Never use substances which may cause
pollution of the environment.
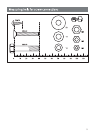
For models with air tires, check air pressure periodically (see tire for recommended psi) Due to the nature
of materials used in air tires on
AERO by Kettler® toys,
it is not recommended that the product to be left
in any one place for too long where solvents or
other chemicals,i. e. petrol,may lie. Thismay result ina
chemical reaction,which could causethe tires
to mark the surface such as a vinyl
If in doubt put
something underneath the wheels to cover
Lubricate the bearing sleeves of the wheels with a few drops of oil every two to
three months.
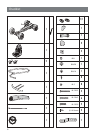
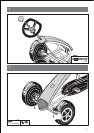
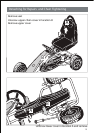
Assembly of the Pedal Car
Please ensure that the vehicle will only be used for playing when assembly has been carried out cor-
rectly, and checked, by an adult.
The toy vehicle must be assembled by an adult person. Study the assembly instructions carefully be-
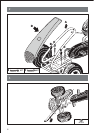
fore beginning work. Assemble the vehicle in the exact sequence shown by the letters in the diagrams.
The vehicle will function as designed when correctly assembled.
Please note that there is always a danger of injury when working with tools or doing manual work.
Therefore please be careful when assembling this machine.
Ensure that your working area is free of possible sources of danger, for example don’t leave any tools
lying around. Always dispose of packaging material in such a way that it may not cause any danger.
There is always a risk of
if children play with plastic bags!
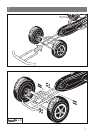
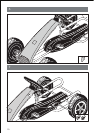
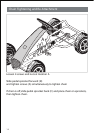
Bolt all the parts together loosely at and check that they have been assembled correctly. Tighten
the locknuts by hand until resistance is felt, then use the wrench to tighten nuts completely against
resistance (lockingdevice). Thencheck that allscrew connections havebeen tightened
rmly.
Please keep original packaging of this article, so that it may be used for transport at a later date, if
necessary.
For technicalreasons, we reserve theright to carry out preliminary assembly work(e.g. additionof tub-
ing plugs).
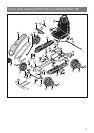
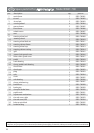
When ordering spare parts, always state the full model number, spare part number, the quantity required
and the serialnumberoftheproduct.
Example order: model # 9981-700/ spare part no. 9981-700#12 / 1 piece / S/N...
Important: spare part prices donot include fastening material; if fastening material (bolts, nuts, washers
etc.) is required it should be clearly stated on the order byadding the words „with fastening material“.