


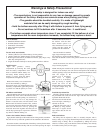

Your kit includes:
1. Metallized inflatable balloon
2. Gondola (thruster module)
3. Transmitter with antenna
4. Putty (for balancing/ballast)
5. Rudder fins
You also need (not included):
1. 1 Battery CR123A (3V Lithium battery) for the gondola.
2. 1 Battery 6F22 (9V Alkaline battery) for the transmitter.
3. Helium gas for the balloon (available from florists, party shops, or any
other shop selling balloons).
4. Single and double sided-tape to attach gondola and fins to balloon.
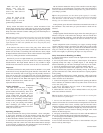
Install Batteries
Open the gondola’s battery
compartment by removing the screw
from the battery compartment's door.
Insert a CR123A lithium battery into
the battery holder, ensuring that the
polarity is correct. Close the battery
compartment and tighten the screw.
Remove the battery cover located at the
rear of the transmitter by sliding it
downwards. Insert a 9V alkaline battery into
the battery compartment, again being careful
to position it so that the polarity is correct.
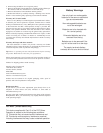
Fill Balloon with Helium
Insert the helium tank nozzle into the Auto-Seal Valve, which is located
within the flap on the seam of the balloon. Gently
push the nozzle into the opening - be careful not to
push the nozzle too far as it may damage the
balloon’s Auto-Seal Valve. Fill the balloon with
Helium until the balloon becomes firm, without
over-stressing the seams. Remove the filler nozzle
then close the auto-seal valve by pressing the
Auto-Seal Valve back together. Note that you can
roll the flap up and tape it in position to minimize
any chance of Helium leaking out.
Connect the Gondola (Thruster Module)
Apply double-sided tape to the inside bottom of the gondola, around the
flat outer area or by which the gondola will be attached to the balloon.
Secure the module to the underside of the blimp. You may find it easiest
to hold the helium-filled airship with one arm while pressing the taped
module to the bottom center of
the balloon with the other
hand. Another option is to
allow the balloon to rise to the
ceiling and then attach the
gondola from the underside.
Once the module is attached,
apply single-sided tape around
the outside lip to ensure maximum adhesion.
Note that the On/Off switch of the gondola should face the rear of the
balloon.
Uncoil the antenna wire and let it trail from the rear of the module -
away from the propellers.
NOTE: Placing the module in the position required for proper balance
may take a few attempts. You can remove and reposition the module by
carefully peeling it away from the balloon. Notice how the balloon reacts
with the weight of the
gondola. If it is nose-heavy
then move it slightly
backward. If it is tail-heavy
then try moving it slightly
toward the front of the
balloon. Make sure the module
is aligned straight along the
axis of the balloon!
Install the Styrofoam Fins
Carefully separate the die-cut styrofoam sheet into 4 fins by following
the perforated lines. Each fin has one edge with tabs that need to be
separated. Bend each tab 90° -
The first tab to the left and the
next to the right, continuing to
alternate to the end .
Attach the fins to the rear of
the Blimp by using double-
sided tape or regular Scotch
tape. Ensure that the fins are
straight!
Ballast the Balloon
The blimp must be adjusted so that it is neutrally buoyant. This is
merely a fancy way of saying that the blimp must float at about eye-level
without rising or falling. This is accomplished by adding the correct
amount of ‘ballast’ putty. Note that the bombs and battery must already
be installed at this point (see next page).
1
UM-14001-20627
Warnings & Safety Precautions!
• This airship is designed for indoor use only!
• The manufacturer is not responsible for any loss or damage caused by unsafe
operation of the blimp. Always use common sense when piloting your blimp!
• The gondola should be handled carefully. It is made of lightweight
materials that can be easily damaged by rough handling.
• Hold the balloon securely after filling it with Helium to prevent it from flying away!
• Do not continue to fill the balloon after it becomes firm - it could burst.
• The balloon expands when temperature rises. If you completely fill the balloon at a low
temperature and the room temperature increases, the balloon may rupture or burst.